Looking to add a database to your Node.js project, but not sure where to start? In this article, I’ll give an overview of the criteria to consider when choosing a database, a recommended NoSQL option, and a brief tutorial.
Table of Contents
- What is Node.js?
- What is Node.js Used For?
- What is the Best Database for Node.js?
- The Benefits of NoSQL
- How to Create a MongoDB Database Using Node.js
- How Do I Get Started with MongoDB?
- How to Create and Connect to a Database Using MongoDB Atlas
- How to Display Data from a MongoDB Atlas Database in Node.js
- Summary
What is Node.js?
Node.js is an open-source JavaScript runtime environment that allows back-end developers to use JavaScript to create server-side applications and APIs.
What is Node.js Used For?
Using Node.js allows your front-end (i.e. React, Vue.js, even jQuery) developers to use the same programming language, JavaScript, as your backend developers. This allows for more cross-functional and agile development. Node.js usage is widespread and ongoing, and I highly recommend it for new development.
What is the Best Database for Node.js?
Let’s take a quick look at some things you should consider when selecting a database.
SQL (e.g., MySQL, PostgreSQL) Versus NoSQL
For most applications, some kind of persistent data storage is required. Traditionally, this would be handled by a relational database such as MySQL, Postgres, SQLite/SQLite3, MSSQL Server, and so on. Relational databases are the right choice for many applications depending on the use case, but there are a few issues you may want to consider.
Significant Upfront Design Needed
In order to create a database in MySQL, a data model or schema is required. Creating and designing this model can be a multi-week process that involves meeting with stakeholders, a design process, and numerous revisions. Once created and populated with data, the model of a SQL database can be difficult to revise due to data dependency issues, so upfront design time is often required.
Performance and Scaling
SQL databases were not originally designed to scale, but instead to have ACID properties. As such, while it is easy to scale a SQL database vertically (e.g., put it on a bigger server), scaling it horizontally (multiple servers) is quite difficult and complex even today.
The Benefits of NoSQL
In contrast, NoSQL databases are great for situations where you need high performance, the ability to scale horizontally, and are dealing with large amounts of unstructured data. NoSQL databases store data in flexible formats—such as graphs, key/values, and documents—which can easily store a wide variety of data. And, because the data is not relationally linked, a NoSQL database can be significantly faster and easier to design, update, and scale.
Perhaps the most commonly used NoSQL database is MongoDB, an open-source document database. In fact, the combination of MongoDB for the database, the Express framework for the back end, React for the front end, and Node.js as the web server is so popular that it is known as the MERN stack for web apps. For the purposes of this article, I’ll use MongoDB as an example of a NoSQL database.
How to Create a MongoDB Database Using Node.js
When creating a database, you can choose to set it up locally or in the cloud. For example, you can spin up an installation on localhost manually of MongoDB by downloading and installing MongoDB. That said, a manual installation comes with ongoing maintenance and upkeep costs. As an application developer, I prefer to avoid as much manual work as possible, so I tend to shy away from manual installation.
For cloud offerings, there is MongoDB Atlas, the database-as-a-service offering from MongoDB. It is platform-agnostic, allowing you to create database clusters on AWS, Azure, and Google Cloud, and scaling is as simple as clicking a button. They also made it easy to get started, with a free M0 tier. The total time from signup to having a created database was less than five minutes for me.
Look for an Officially Supported Driver
As with any integration between two technologies, life is made easier when there is an officially-supported driver for the interface. (For an example of a non-officially supported database driver, check out the Node.js Driver for SQL Server.) Official support leads to better documentation, more robust functionality, and the option for direct support from the maker.
In this case, the official MongoDB Node Driver comes directly from MongoDB and is easy to use. Installing it in your Node.js project is as simple as running the following command:
npm install mongodb --saveThe driver makes connecting to your database, authentication, CRUD operations, and even logging/monitoring as simple as running a command. The driver also supports JavaScript promise/async features. This makes it easy to interact with your data from your Node.js application.
For more information, check out how to connect to a MongoDB database, or take their free online class, MongoDB for JavaScript developers.
How Do I Get Started with MongoDB?
Wondering where to begin? Here is a brief tutorial to get you started.
Install Node.js and NPM
First, you’ll need to install Node.js. I recommend the long-term support version. This will also install NPM. NPM is the Node Package Manager, and it comes alongside Node.js to allow the easy installation of many third-party packages.
Add the MongoDB Node.js Driver
From the command line/terminal in your project folder, run the following command:
npm install mongodb --saveThis will automatically download the latest version of the driver and save it to your package.json config.
How to Create and Connect to a Database Using MongoDB Atlas
1. Create an account to register free for MongoDB Atlas
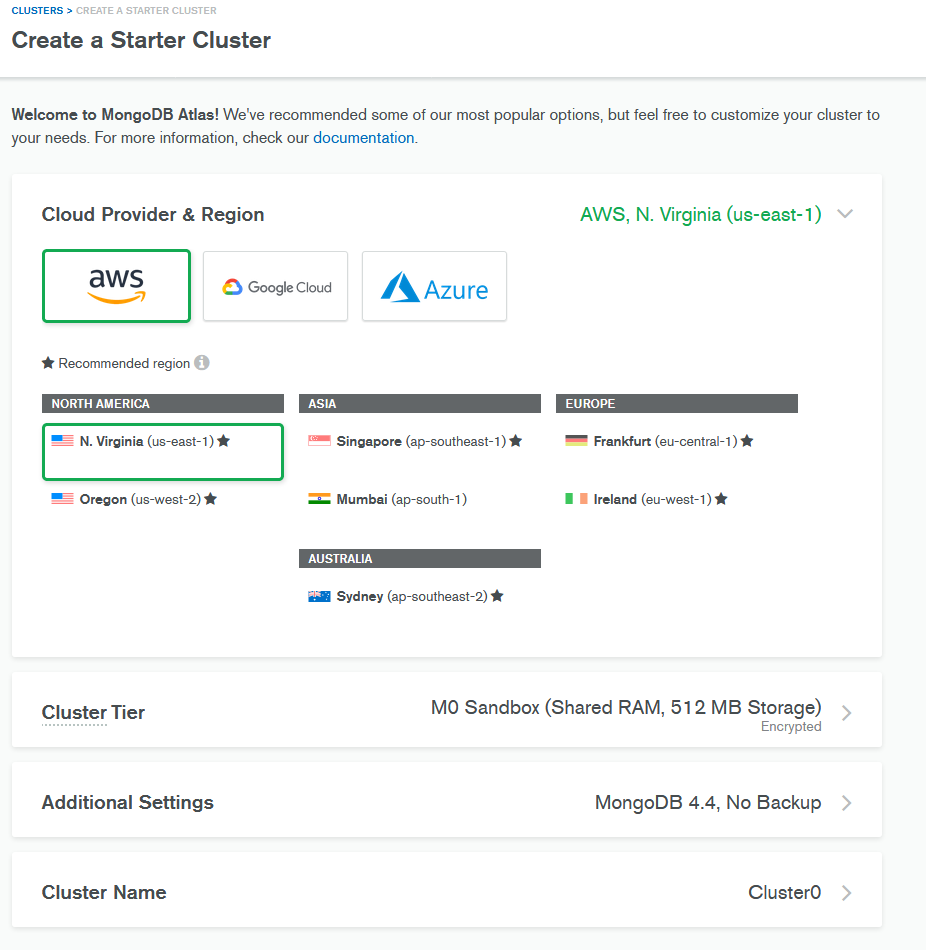
2. Next, create a database cluster on your platform of choice.
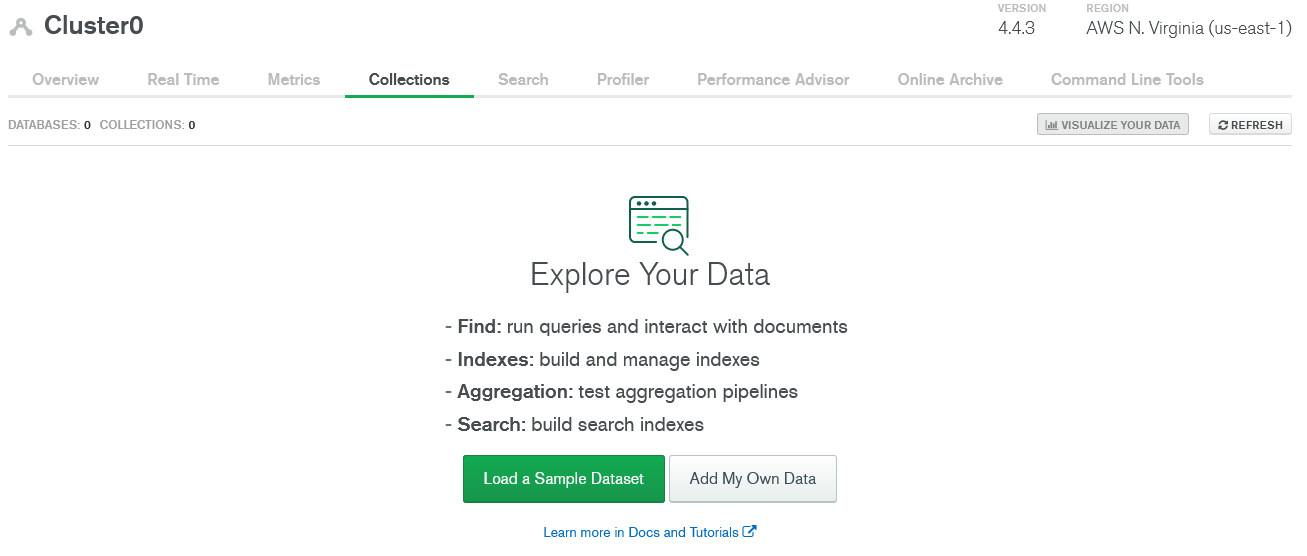
3. Load the sample data under “Collections.”
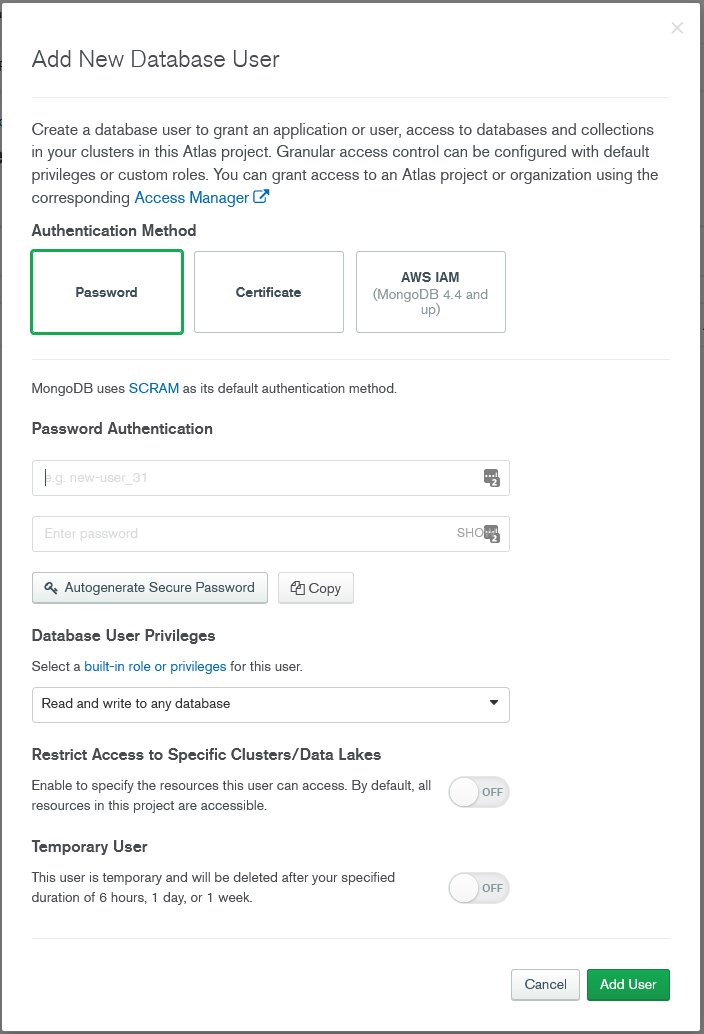
4. Set up connectivity and create a database user.
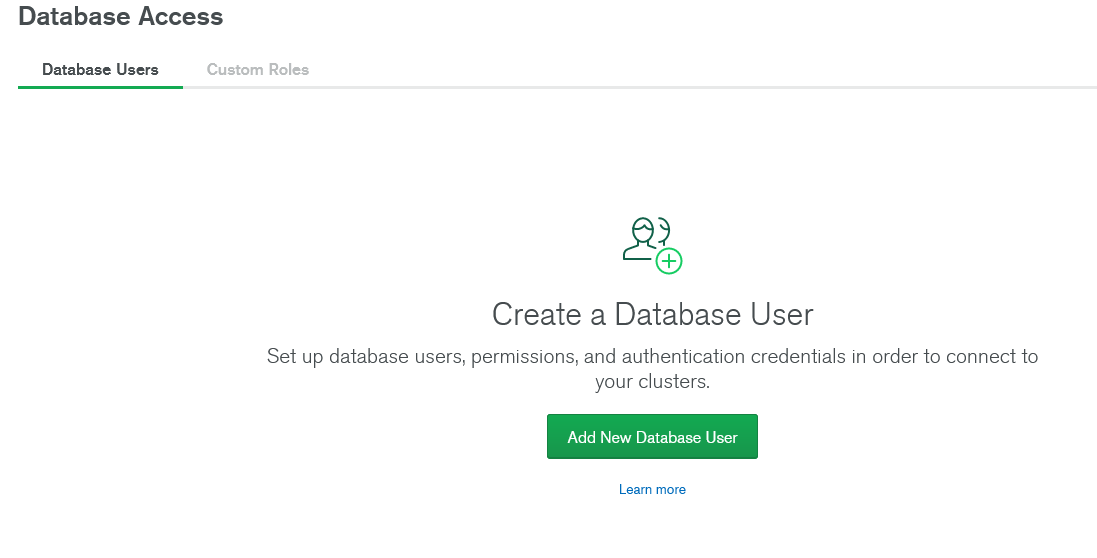
By default, users have both read and write permissions to any database in the cluster. For testing purposes, this is fine; but for a production application, you should carefully consider what permissions are necessary for each user.
Make sure to save the password.
5. Next, choose the “Connect your application” option.
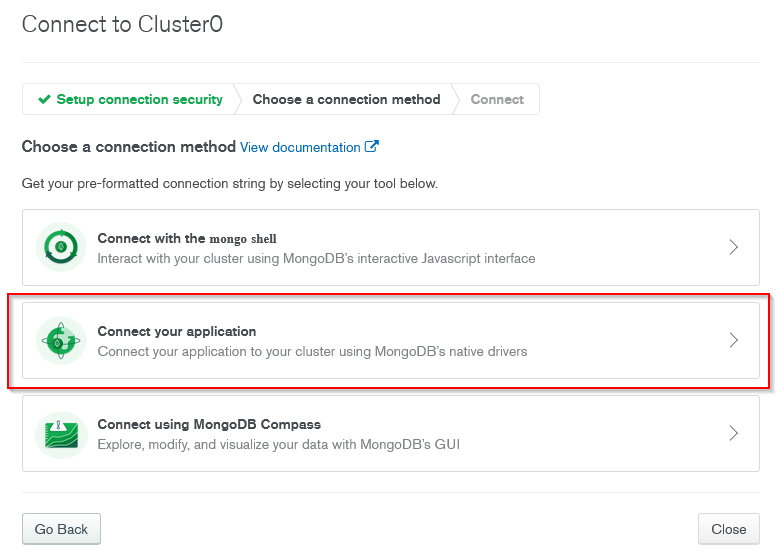
6. Copy out the connection code provided in the template, and fill in your password and “sample_airbnb” for the database name. The syntax is as follows:
async function main() {
  const MongoClient = require('mongodb').MongoClient;
  const uri =
    'mongodb+srv://dbUser:<dbpassword>@cluster0.dcu5m.mongodb.net/sample_airbnb?retryWrites=true&w=majority';
  const client = new MongoClient(uri, { useNewUrlParser: true });
  client.connect((err) => {
    const collection = client.db('test').collection('devices');
    // perform actions on the collection object
    client.close();
  });
}
main().catch(console.error);
7. Assuming you saved this as “mongo.js” on your file system, try it out by running the following command:
node mongo.jsIf everything works, you will not see any output other than some informational messages. Let’s go ahead and create some output.
How to Display Data from a MongoDB Atlas Database in Node.js
Now that we’ve connected to our Atlas database, let’s do a bit of querying. I’ve created a simple findListings function to query listings from the sample database. The code for the function is as follows:
async function findListings(client, resultsLimit) {
  const cursor = client
    .db('sample_airbnb')
    .collection('listingsAndReviews')
    .find()
    .limit(resultsLimit);

  const results = await cursor.toArray();
  if (results.length > 0) {
    console.log(`Found ${results.length} listing(s):`);
    results.forEach((result, i) => {
      date = new Date(result.last_review).toDateString();

      console.log();
      console.log(`${i + 1}. name: ${result.name}`);
      console.log(`   _id: ${result._id}`);
      console.log(`   bedrooms: ${result.bedrooms}`);
      console.log(`   bathrooms: ${result.bathrooms}`);
      console.log(
        `   most recent review date: ${new Date(
          result.last_review
        ).toDateString()}`
      );
    });
  }
}
Go ahead and copy it into the bottom of your mongo.js file. Next, let’s update our connection code to use an async pattern and remove the callback. Then, let’s call our query function as follows:
async function main() {
  const MongoClient = require('mongodb').MongoClient;
  const uri =
    'mongodb+srv://dbUser:<dbpassword>@cluster0.dcu5m.mongodb.net/sample_airbnb?retryWrites=true&w=majority';
  const client = new MongoClient(uri, { useNewUrlParser: true });

  // Connect to the client and query
  await client.connect();
  findListings(client, 5);
  client.close();
}
The full code should look as follows:
  async function main() {
  const MongoClient = require('mongodb').MongoClient;
  const uri =
    'mongodb+srv://dbUser:<dbpassword>@cluster0.dcu5m.mongodb.net/sample_airbnb?retryWrites=true&w=majority';
  const client = new MongoClient(uri, { useNewUrlParser: true });

  // Connect to the client and query
  await client.connect();
  findListings(client, 5);
  client.close();
}

main().catch(console.error);

async function findListings(client, resultsLimit) {
  const cursor = client
    .db('sample_airbnb')
    .collection('listingsAndReviews')
    .find()
    .limit(resultsLimit);

  const results = await cursor.toArray();
  if (results.length > 0) {
    console.log(`Found ${results.length} listing(s):`);
    results.forEach((result, i) => {
      date = new Date(result.last_review).toDateString();

      console.log();
      console.log(`${i + 1}. name: ${result.name}`);
      console.log(`   _id: ${result._id}`);
      console.log(`   bedrooms: ${result.bedrooms}`);
      console.log(`   bathrooms: ${result.bathrooms}`);
      console.log(
        `   most recent review date: ${new Date(
          result.last_review
        ).toDateString()}`
      );
    });
  }
}
Run node mongo.js again, and you should see five listings in your console:
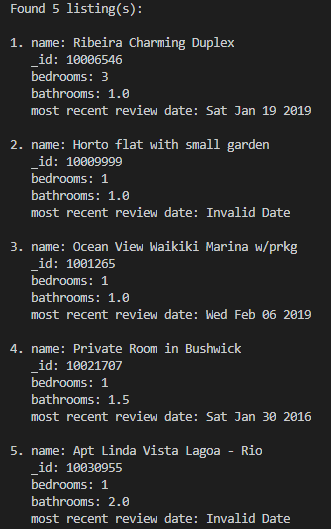
Success! You’ve connected to, queried, and displayed data from your MongoDB database. For a more detailed step-by-step and more code examples, check out this post by Lauren Schaefer.
Summary
In this article, I went through my thought process when selecting a database for a Node.js application, local versus cloud setup, the benefits of having an officially-supported driver, and first steps towards getting set up with MongoDB. While the world of databases can be complex and intimidating at times, I hope this article made it a bit simpler for you.