Overview
Realm Studio gives you the ability to view and modify objects in your realm file. You can:
Import data from a CSV
Create new objects
Modify and delete existing objects
You can then save the data as JSON or a realm file, and import it into your client app or production database.
Import from a CSV
Note
If you want to use a new class when importing data, you must create the class before starting the import.
Choose the destination class for your objects
You'll see a drop-down selector containing the available classes in your realm file. Select the class where the imported data should become objects.
Press the Import data button.
Now you'll see newly-created objects created from the data you imported. Each object's properties map to the properties of the class you selected during import.
Create an Object
Consider Object Relationships
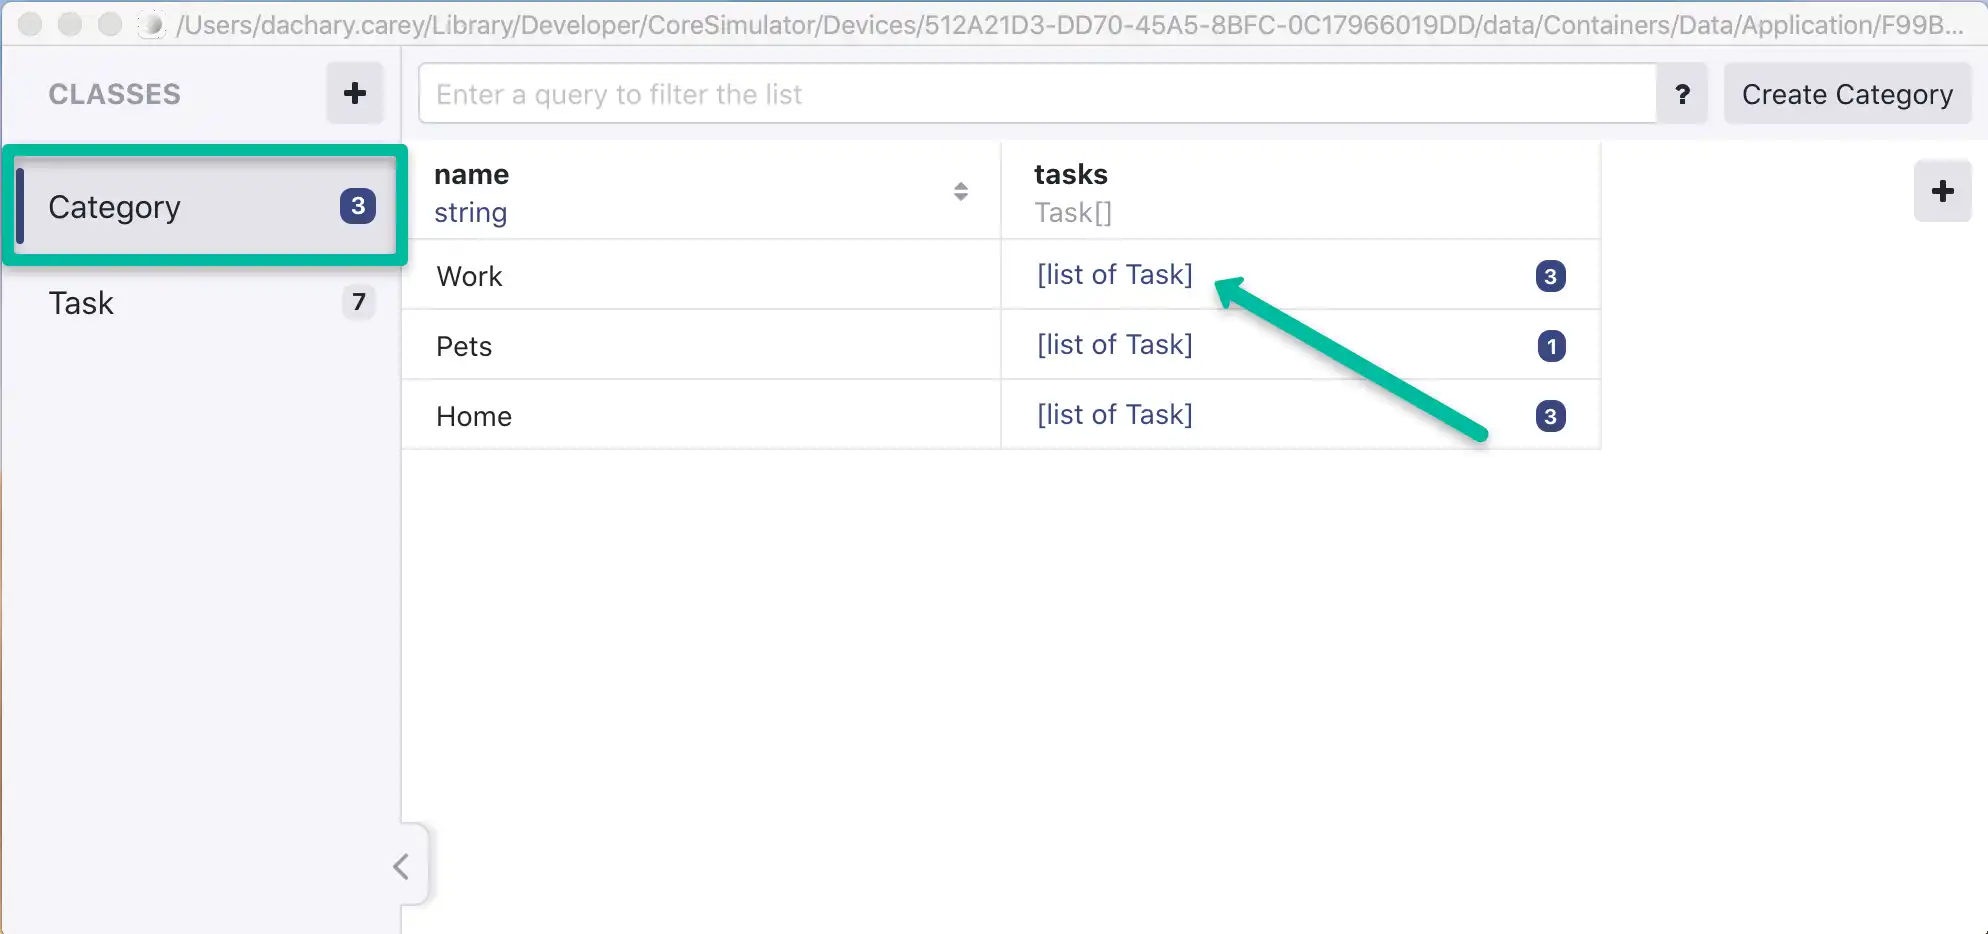
When you create a new object, think about the relationships between the objects. For example, a to-do app, might have categories and tasks. The categories have a to-many relationship to the tasks; one category may have many tasks. The tasks have an inverse relationship to the category.
In Realm, a to-many relationship is represented as a
list property linking the two objects. In the example of a to-do app,
the Category class has a list property whose value is all of the
related Task objects.
In the Realm Studio UI, you would select the Category class. Click
into the [list-of-task] property for the category where you want to
add the task - for example, "Work".

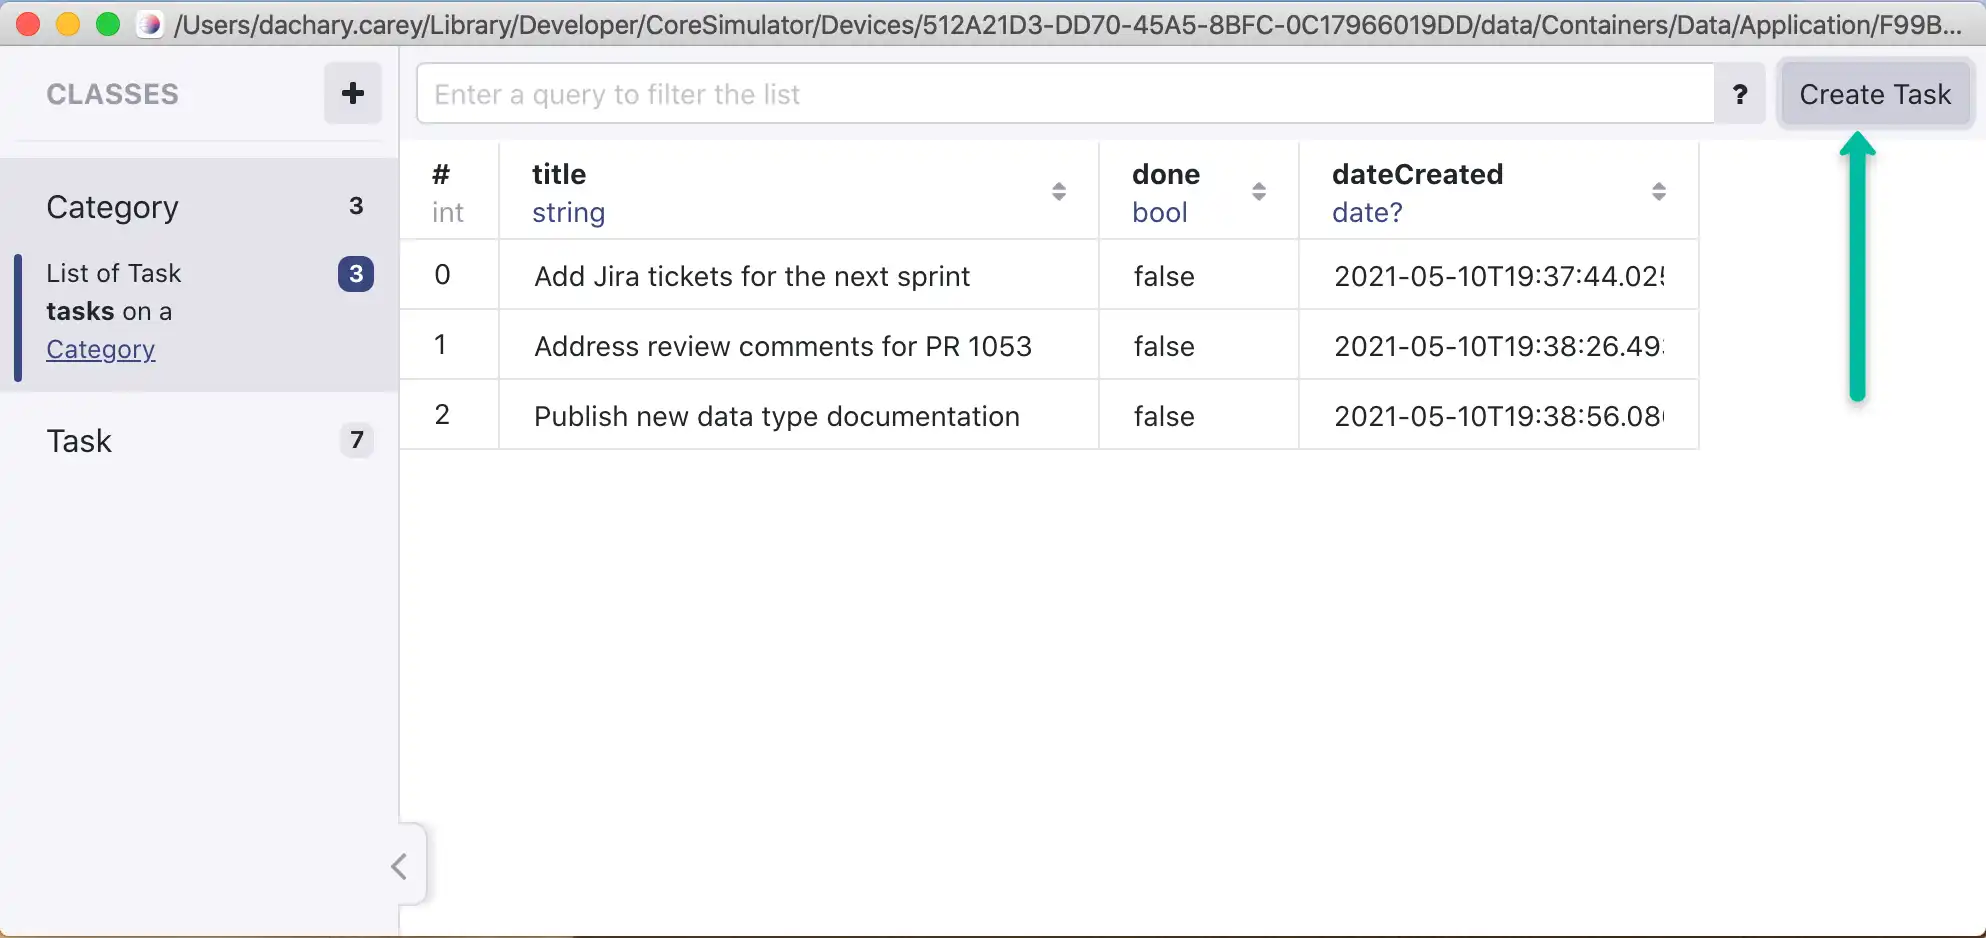
You'll see all the task objects that have an inverse relationship with the Work category. When you create the new task object from within the Work list, Realm Studio sets the inverse relationship with the Work parent category.

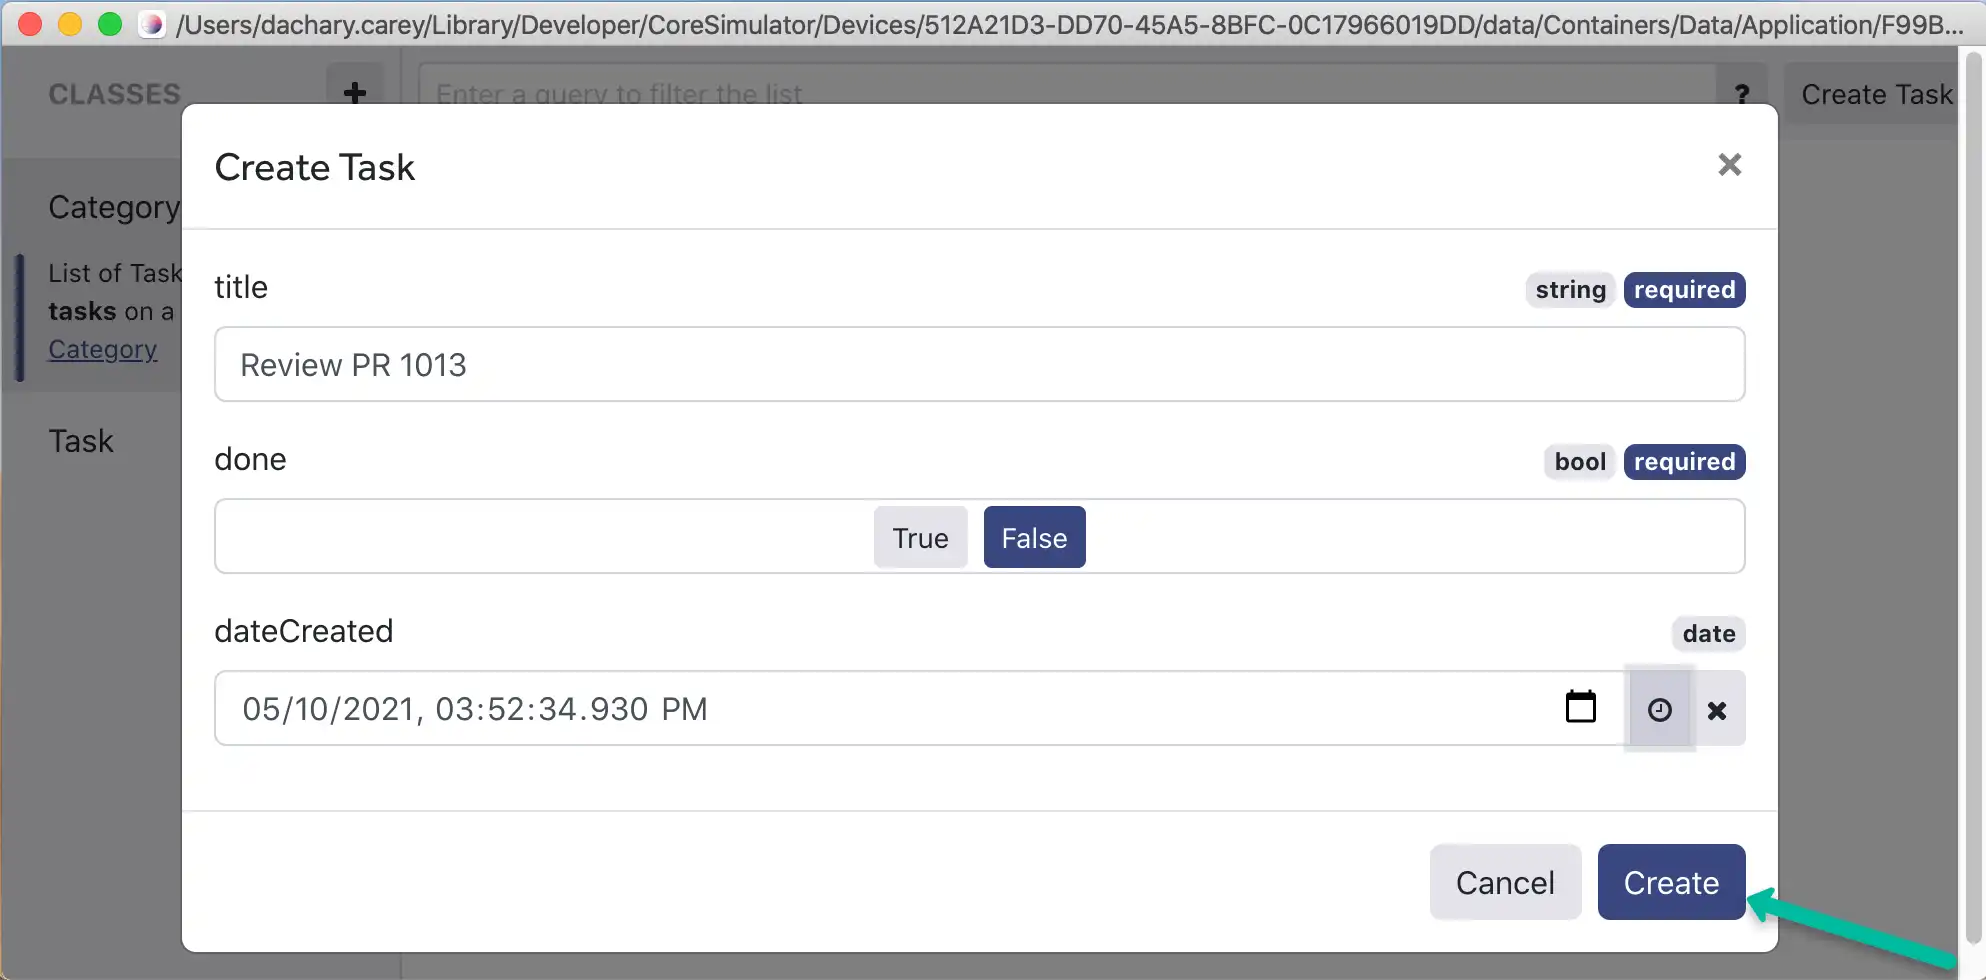
From here, you might create a new task object to "Review PR 1013." The new task will be linked to the "Work" category through an inverse relationship.

If you select the Task class directly, you could create a new task
object. But that task object would not have an inverse relationship with
any parent category. You would then have to manually add the orphaned
task object to the category
where it belongs.
Create the Object
Create the new object
Once you've decided where to create your new object, you can do this in two ways:
Click the Create {Class name} button in the upper right corner of the app
Right click (or control click) anywhere in the main window to bring up the contextual menu, and select Create new {Class name}
Either option will open a dialog where you can set the properties for the object. When you've specified the required properties, press the Create button.
If you create an orphaned object that is not associated with a parent object via a linking property, you'll need to add it manually to the linked object. See: Modify an Object.
Modify an Object
There are a few ways you can modify a realm object in Realm Studio:
Change a field value
Change an object relationship
Change a Field Value
You can manually change an object's field values:
Click into the field of an object
Enter a different value
Realm Studio provides simple type validation, such as providing a list of
acceptable boolean options: Use "true", "false", "0", or "1",
or automatically converting a date into a valid datetime. However, this
validation may lead to unexpected behavior. For example, typing "123abc"
into an int field simply discards the non-numeric characters without
providing user feedback or errors. Therefore, it is up to you to ensure
the data you enter into a field value is of the correct type.
Change an Object's Relationships
You can change an object's relationship with other objects using Realm Studio.
To add a new object relationship:
Click into the property that defines the relationship
Right-click (or control-click) anywhere in the main pane, and select Add existing {linked class name}
Select the object you want to link, and press the Select button
Important
Adding an object relationship does not remove an existing object relationship. If you want to change an object relationship; for example, move a task from one category to another; you must also remove the relationship that linked the task to the old category.
To remove an object relationship:
Click into the property that defines the relationship.
Right-click (or control-click) the object whose relationship you want to remove, and select Remove selected row from the list or Delete selected object depending on the type of relationship.
You'll see a dialog asking you to confirm the action. Press the button to confirm you want to remove or delete the object.
Delete an Object
To delete an object from a realm:
Right-click (or control-click) the object you want to delete, and select Delete selected object.
You'll see a dialog asking you to confirm the action. Press the Delete selected object button to confirm.
Tip
If you don't see the Delete selected object option, you may be viewing it in a linking relationship list view. Go directly to the class where the object is stored.
If you're in the class where the object is stored, and still don't see the Delete selected objects option, it may be because you have another object selected. Click to select the object you want to delete, and then right-click (or control-click) to get the delete option.
Save the Data
Because realm objects are live objects, you can make changes to a realm file and see them reflected in a client app in realtime. Realm Studio gives you a few save options if you want to do other things with the data. To save the file, follow these steps:
Go to File > Save data and select JSON or Local Realm.
Select the filename and destination where you want to save the file.
Press the Save button.
Use the JSON File
If you have saved the data as JSON, you can import it back into your app. Use your preferred method to import the JSON into your app.
Important
"Flatted" files
When exporting to a JSON file, Realm Studio uses the
Flatted package. If you want to
open the file in another application, you will need to use Flatted.parse().
Use the Realm File
If you save the data as a realm file, and you haven't modified the schema, you can use that realm file as a direct replacement for the existing realm file in your client app. Simply replace the existing realm file on your filesystem with the new one.
Alternately, you could save a copy of the realm, open the copy, and make schema changes on the copy. This would preserve your intact original realm file, but still enable you to iterate on schema. You would then be able to continue to use your existing realm file in your client app without performing a migration. You could test migrations for your new schema with the second realm file at your leisure.