Docs Menu
Docs Home
/
MongoDB Atlas
/

Retrieval-Augmented Generation (RAG) with Atlas Vector Search

On this page

  • Why use RAG?
  • RAG with Atlas Vector Search
  • Ingestion
  • Retrieval
  • Generation
  • Get Started
  • Prerequisites
  • Procedure
  • Next Steps
  • Fine-Tuning

Retrieval-augmented generation (RAG) is an architecture used to augment large language models (LLMs) with additional data so that they can generate more accurate responses. You can implement RAG in your generative AI applications by combining an LLM with a retrieval system powered by Atlas Vector Search.

Get Started

When working with LLMs, you might encounter the following limitations:

  • Stale data: LLMs are trained on a static dataset up to a certain point in time. This means that they have a limited knowledge base and might use outdated data.

  • No access to local data: LLMs don't have access to local or personalized data. Therefore, they can lack knowledge about specific domains.

  • Hallucinations: When training data is incomplete or outdated, LLMs can generate inaccurate information.

You can address these limitations by taking the following steps to implement RAG:

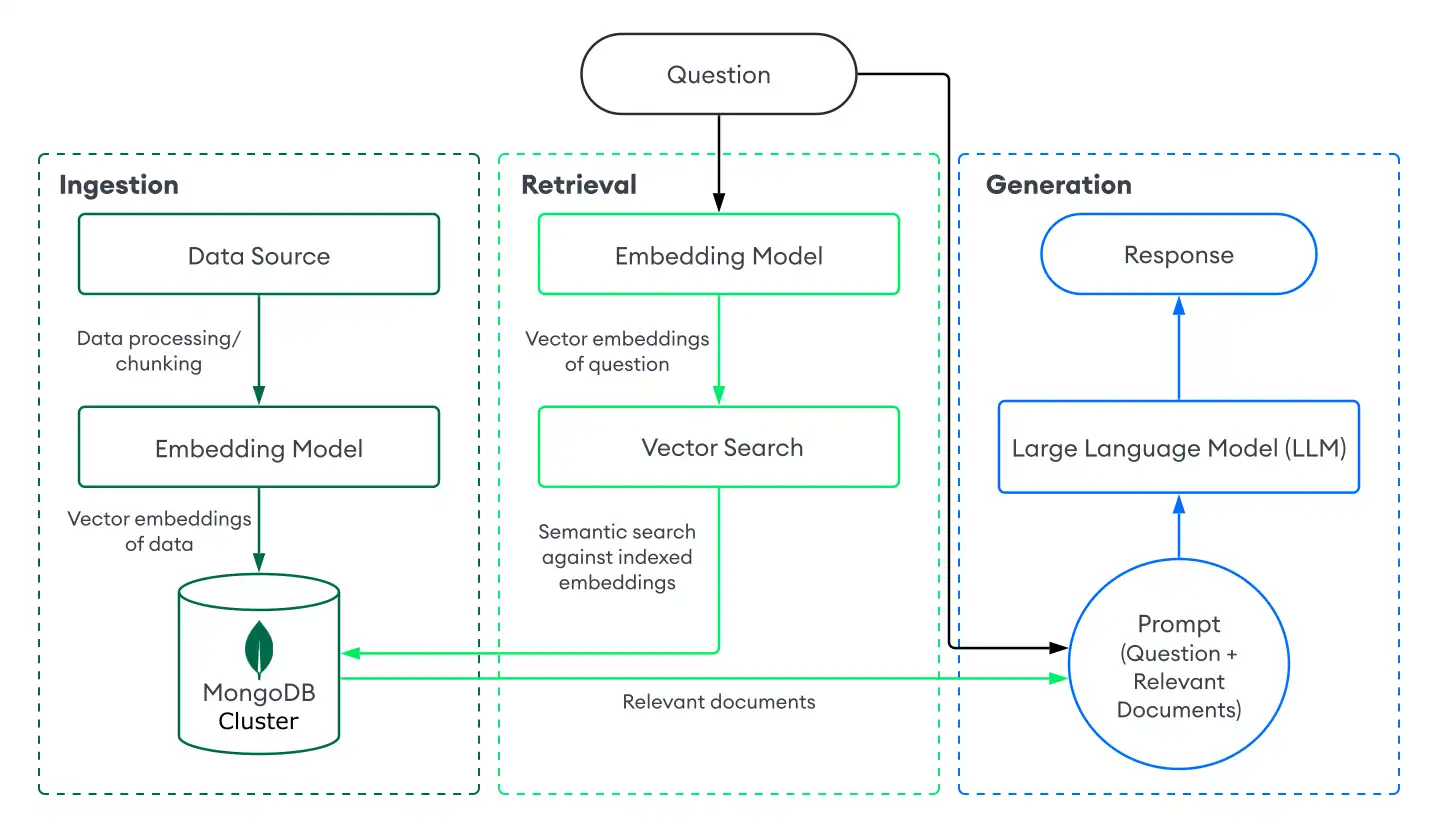
  1. Ingestion: Store your custom data as vector embeddings in a vector database, such as MongoDB Atlas. This allows you to create a knowledge base of up-to-date and personalized data.

  2. Retrieval: Retrieve semantically similar documents from the database based on the user's question by using a search solution, such as Atlas Vector Search. These documents augment the LLM with additional, relevant data.

  3. Generation: Prompt the LLM. The LLM uses the retrieved documents as context to generate a more accurate and relevant response, reducing hallucinations.

Because RAG enables tasks such as question answering and text generation, it's an effective architecture for building AI chatbots that provide personalized, domain-specific responses. To create production-ready chatbots, you must configure a server to route requests and build a user interface on top of your RAG implementation.

To implement RAG with Atlas Vector Search, you ingest data into Atlas, retrieve documents with Atlas Vector Search, and generate responses using an LLM. This section describes the components of a basic, or naive, RAG implementation with Atlas Vector Search. For step-by-step instructions, see Get Started.

RAG flowchart with Atlas Vector Search
click to enlarge

Data ingestion for RAG involves processing your custom data and storing it in a vector database to prepare it for retrieval. To create a basic ingestion pipeline with Atlas as the vector database, do the following:

  1. Load the data.

    Use tools like document loaders to load data from different data formats and locations.

  2. Split the data into chunks.

    Process, or chunk, your data. Chunking involves splitting your data into smaller parts to improve performance.

  3. Convert the data to vector embeddings.

    Convert your data into vector embeddings by using an embedding model. To learn more, see How to Create Vector Embeddings.

  4. Store the data and embeddings in Atlas.

    Store these embeddings in Atlas. You store embeddings as a field alongside other data in your collection.

  1. Load the data.

    Use tools like document loaders and parsers to load data from different data formats and locations.

  2. Split the parsed data into chunks.

    Process, or chunk, your data. Chunking involves splitting your data into smaller parts to improve performance.

  3. Convert the data to vector embeddings.

    Convert your data into vector embeddings using an embedding model. To learn more, see How to Create Vector Embeddings.

  4. Store the data and embeddings in Atlas.

    Store these embeddings in Atlas. You store embeddings as a field alongside other data in your collection.

  1. Load the data.

    Use tools like document loaders or data connectors to load data from different data formats and locations.

  2. Split the data into chunks.

    Process, or chunk, your data. Chunking involves splitting your data into smaller parts to improve performance.

  3. Convert the data to vector embeddings.

    Convert your data into vector embeddings by using an embedding model. To learn more, see How to Create Vector Embeddings.

  4. Store the data and embeddings in Atlas.

    Store these embeddings in Atlas. You store embeddings as a field alongside other data in your collection.

  1. Load the data.

    Use tools like document loaders or data connectors to load data from different data formats and locations.

  2. Split the data into chunks.

    Process, or chunk, your data. Chunking involves splitting your data into smaller parts to improve performance.

  3. Convert the data to vector embeddings.

    Convert your data into vector embeddings by using an embedding model. To learn more, see How to Create Vector Embeddings.

  4. Store the data and embeddings in Atlas.

    Store these embeddings in Atlas. You store embeddings as a field alongside other data in your collection.

Building a retrieval system involves searching for and returning the most relevant documents from your vector database to augment the LLM with. To retrieve relevant documents with Atlas Vector Search, you convert the user's question into vector embeddings and run a vector search query against your data in Atlas to find documents with the most similar embeddings.

To perform basic retrieval with Atlas Vector Search, do the following:

  1. Define an Atlas Vector Search index on the collection that contains your vector embeddings.

  2. Choose one of the following methods to retrieve documents based on the user's question:

    • Use an Atlas Vector Search integration with a popular framework or service. These integrations include built-in libraries and tools that enable you to easily build retrieval systems with Atlas Vector Search.

    • Build your own retrieval system. You can define your own functions and pipelines to run Atlas Vector Search queries specific to your use case.

      To learn how to build a basic retrieval system with Atlas Vector Search, see Get Started.

To generate responses, combine your retrieval system with an LLM. After you perform a vector search to retrieve relevant documents, you provide the user's question along with the relevant documents as context to the LLM so that it can generate a more accurate response.

Choose one of the following methods to connect to an LLM:

  • Use an Atlas Vector Search integration with a popular framework or service. These integrations include built-in libraries and tools to help you connect to LLMs with minimal set-up.

  • Call the LLM's API. Most AI providers offer APIs to their generative models that you can use to generate responses.

  • Load an open-source LLM. If you don't have API keys or credits, you can use an open-source LLM by loading it locally from your application. For an example implementation, see the Build a Local RAG Implementation with Atlas Vector Search tutorial.

Learn how to develop a RAG system with Atlas Vector Search.

Duration: 1.16 Minutes

The following example demonstrates how to implement RAG with a retrieval system powered by Atlas Vector Search and open-source models from Hugging Face.


➤ Use the Select your language drop-down menu to set the language of the examples on this page.


Tip

Work with a runnable version of this tutorial as a Python notebook.

To complete this example, you must have the following:

  • An Atlas account with a cluster running MongoDB version 6.0.11, 7.0.2, or later (including RCs). Ensure that your IP address is included in your Atlas project's access list. To learn more, see Create a Cluster.

  • Java Development Kit (JDK) version 8 or later.

  • An environment to set up and run a Java application. We recommend that you use an integrated development environment (IDE) such as IntelliJ IDEA or Eclipse IDE to configure Maven or Gradle to build and run your project.

  • An Atlas account with a cluster running MongoDB version 6.0.11, 7.0.2, or later (including RCs). Ensure that your IP address is included in your Atlas project's access list. To learn more, see Create a Cluster.

  • A Hugging Face Access Token with read access.

  • An environment to run interactive Python notebooks such as Colab.

    Note

    If you're using Colab, ensure that your notebook session's IP address is included in your Atlas project's access list.

1
  1. Initialize your Go project.

    Run the following commands in your terminal to create a new directory named rag-mongodb and initialize your project:

    mkdir rag-mongodb
    cd rag-mongodb
    go mod init rag-mongodb
  2. Install and import dependencies.

    Run the following commands:

    go get github.com/joho/godotenv
    go get go.mongodb.org/mongo-driver/mongo
    go get github.com/tmc/langchaingo/llms
    go get github.com/tmc/langchaingo/documentloaders
    go get github.com/tmc/langchaingo/embeddings/huggingface
    go get github.com/tmc/langchaingo/llms/huggingface
    go get github.com/tmc/langchaingo/prompts
  3. Create a .env file.

    In your project, create a .env file to store your Atlas connection string and Hugging Face access token.

    .env
    HUGGINGFACEHUB_API_TOKEN = "<access-token>"
    ATLAS_CONNECTION_STRING = "<connection-string>"

Replace the <access-token> placeholder value with your Hugging Face access token.

Replace the <connection-string> placeholder value with the SRV connection string for your Atlas cluster.

Your connection string should use the following format:

mongodb+srv://<db_username>:<db_password>@<clusterName>.<hostname>.mongodb.net
2

In this section, you create a function that:

  • Loads the mxbai-embed-large-v1 embedding model from Hugging Face's model hub.

  • Creates vector embeddings from the inputted data.

  1. Run the following command to create a directory that stores common functions, including one that you'll reuse to create embeddings.

    mkdir common && cd common
  2. Create a file called get-embeddings.go in the common directory, and paste the following code into it:

    get-embeddings.go
    package common
    import (
    "context"
    "log"
    "github.com/tmc/langchaingo/embeddings/huggingface"
    )
    func GetEmbeddings(documents []string) [][]float32 {
    hf, err := huggingface.NewHuggingface(
    huggingface.WithModel("mixedbread-ai/mxbai-embed-large-v1"),
    huggingface.WithTask("feature-extraction"))
    if err != nil {
    log.Fatalf("failed to connect to Hugging Face: %v", err)
    }
    embs, err := hf.EmbedDocuments(context.Background(), documents)
    if err != nil {
    log.Fatalf("failed to generate embeddings: %v", err)
    }
    return embs
    }
3

In this section, you ingest sample data into Atlas that LLMs don't have access to. The following code uses the Go library for LangChain and Go driver to do the following:

  • Create a HTML file that contains a MongoDB earnings report.

  • Split the data into chunks, specifying the chunk size (number of characters) and chunk overlap (number of overlapping characters between consecutive chunks).

  • Create vector embeddings from the chunked data by using the GetEmbeddings function that you defined.

  • Store these embeddings alongside the chunked data in the rag_db.test collection in your Atlas cluster.

  1. Navigate to the root of the rag-mongodb project directory.

  2. Create a file called ingest-data.go in your project, and paste the following code into it:

    ingest-data.go
    package main
    import (
    "context"
    "fmt"
    "io"
    "log"
    "net/http"
    "os"
    "rag-mongodb/common" // Module that contains the embedding function
    "github.com/joho/godotenv"
    "github.com/tmc/langchaingo/documentloaders"
    "github.com/tmc/langchaingo/textsplitter"
    "go.mongodb.org/mongo-driver/mongo"
    "go.mongodb.org/mongo-driver/mongo/options"
    )
    type DocumentToInsert struct {
    PageContent string `bson:"pageContent"`
    Embedding []float32 `bson:"embedding"`
    }
    func downloadReport(filename string) {
    _, err := os.Stat(filename)
    if err == nil {
    return
    }
    url := "https://investors.mongodb.com/node/12236"
    fmt.Println("Downloading ", url, " to ", filename)
    resp, err := http.Get(url)
    if err != nil {
    log.Fatalf("failed to connect to download the report: %v", err)
    }
    defer func() { _ = resp.Body.Close() }()
    f, err := os.Create(filename)
    if err != nil {
    return
    }
    defer func() { _ = f.Close() }()
    _, err = io.Copy(f, resp.Body)
    if err != nil {
    log.Fatalf("failed to copy the report: %v", err)
    }
    }
    func main() {
    ctx := context.Background()
    filename := "investor-report.html"
    downloadReport(filename)
    f, err := os.Open(filename)
    if err != nil {
    defer func() { _ = f.Close() }()
    log.Fatalf("failed to open the report: %v", err)
    }
    defer func() { _ = f.Close() }()
    html := documentloaders.NewHTML(f)
    split := textsplitter.NewRecursiveCharacter()
    split.ChunkSize = 400
    split.ChunkOverlap = 20
    docs, err := html.LoadAndSplit(context.Background(), split)
    if err != nil {
    log.Fatalf("failed to chunk the HTML into documents: %v", err)
    }
    fmt.Printf("Successfully chunked the HTML into %v documents.\n", len(docs))
    if err := godotenv.Load(); err != nil {
    log.Fatal("no .env file found")
    }
    // Connect to your Atlas cluster
    uri := os.Getenv("ATLAS_CONNECTION_STRING")
    if uri == "" {
    log.Fatal("set your 'ATLAS_CONNECTION_STRING' environment variable.")
    }
    clientOptions := options.Client().ApplyURI(uri)
    client, err := mongo.Connect(ctx, clientOptions)
    if err != nil {
    log.Fatalf("failed to connect to the server: %v", err)
    }
    defer func() { _ = client.Disconnect(ctx) }()
    // Set the namespace
    coll := client.Database("rag_db").Collection("test")
    fmt.Println("Generating embeddings.")
    var pageContents []string
    for i := range docs {
    pageContents = append(pageContents, docs[i].PageContent)
    }
    embeddings := common.GetEmbeddings(pageContents)
    docsToInsert := make([]interface{}, len(embeddings))
    for i := range embeddings {
    docsToInsert[i] = DocumentToInsert{
    PageContent: pageContents[i],
    Embedding: embeddings[i],
    }
    }
    result, err := coll.InsertMany(ctx, docsToInsert)
    if err != nil {
    log.Fatalf("failed to insert documents: %v", err)
    }
    fmt.Printf("Successfully inserted %v documents into Atlas\n", len(result.InsertedIDs))
    }
  3. Run the following command to execute the code:

    go run ingest-data.go
    Successfully chunked the HTML into 163 documents.
    Generating embeddings.
    Successfully inserted document with id: &{ObjectID("66faffcd60da3f6d4f990fa4")}
    Successfully inserted document with id: &{ObjectID("66faffce60da3f6d4f990fa5")}
    ...
4

In this section, you set up Atlas Vector Search to retrieve documents from your vector database. Complete the following steps:

  1. Create an Atlas Vector Search index on your vector embeddings.

    Create a new file named rag-vector-index.go and paste the following code. This code connects to your Atlas cluster and creates an index of the vectorSearch type on the rag_db.test collection.

    rag-vector-index.go
    package main
    import (
    "context"
    "log"
    "os"
    "time"
    "go.mongodb.org/mongo-driver/bson"
    "github.com/joho/godotenv"
    "go.mongodb.org/mongo-driver/mongo"
    "go.mongodb.org/mongo-driver/mongo/options"
    )
    func main() {
    ctx := context.Background()
    if err := godotenv.Load(); err != nil {
    log.Fatal("no .env file found")
    }
    // Connect to your Atlas cluster
    uri := os.Getenv("ATLAS_CONNECTION_STRING")
    if uri == "" {
    log.Fatal("set your 'ATLAS_CONNECTION_STRING' environment variable.")
    }
    clientOptions := options.Client().ApplyURI(uri)
    client, err := mongo.Connect(ctx, clientOptions)
    if err != nil {
    log.Fatalf("failed to connect to the server: %v", err)
    }
    defer func() { _ = client.Disconnect(ctx) }()
    // Specify the database and collection
    coll := client.Database("rag_db").Collection("test")
    indexName := "vector_index"
    opts := options.SearchIndexes().SetName(indexName).SetType("vectorSearch")
    type vectorDefinitionField struct {
    Type string `bson:"type"`
    Path string `bson:"path"`
    NumDimensions int `bson:"numDimensions"`
    Similarity string `bson:"similarity"`
    }
    type filterField struct {
    Type string `bson:"type"`
    Path string `bson:"path"`
    }
    type vectorDefinition struct {
    Fields []vectorDefinitionField `bson:"fields"`
    }
    indexModel := mongo.SearchIndexModel{
    Definition: vectorDefinition{
    Fields: []vectorDefinitionField{{
    Type: "vector",
    Path: "embedding",
    NumDimensions: 1024,
    Similarity: "cosine"}},
    },
    Options: opts,
    }
    log.Println("Creating the index.")
    searchIndexName, err := coll.SearchIndexes().CreateOne(ctx, indexModel)
    if err != nil {
    log.Fatalf("failed to create the search index: %v", err)
    }
    // Await the creation of the index.
    log.Println("Polling to confirm successful index creation.")
    log.Println("NOTE: This may take up to a minute.")
    searchIndexes := coll.SearchIndexes()
    var doc bson.Raw
    for doc == nil {
    cursor, err := searchIndexes.List(ctx, options.SearchIndexes().SetName(searchIndexName))
    if err != nil {
    log.Printf("failed to list search indexes: %w", err)
    }
    if !cursor.Next(ctx) {
    break
    }
    name := cursor.Current.Lookup("name").StringValue()
    queryable := cursor.Current.Lookup("queryable").Boolean()
    if name == searchIndexName && queryable {
    doc = cursor.Current
    } else {
    time.Sleep(5 * time.Second)
    }
    }
    log.Println("Name of Index Created: " + searchIndexName)
    }
  2. Run the following command to create the index:

    go run rag-vector-index.go
  3. Define a function to retrieve relevant data.

    In this step, you create a retrieval function called GetQueryResults that runs a query to retrieve relevant documents. It uses the GetEmbeddings function to create embeddings from the search query. Then, it runs the query to return semantically-similar documents.

    To learn more, refer to Run Vector Search Queries.

    In the common directory, create a new file called get-query-results.go, and paste the following code into it:

    get-query-results.go
    package common
    import (
    "context"
    "log"
    "os"
    "github.com/joho/godotenv"
    "go.mongodb.org/mongo-driver/bson"
    "go.mongodb.org/mongo-driver/mongo"
    "go.mongodb.org/mongo-driver/mongo/options"
    )
    type TextWithScore struct {
    PageContent string `bson:"pageContent"`
    Score float64 `bson:"score"`
    }
    func GetQueryResults(query string) []TextWithScore {
    ctx := context.Background()
    if err := godotenv.Load(); err != nil {
    log.Fatal("no .env file found")
    }
    // Connect to your Atlas cluster
    uri := os.Getenv("ATLAS_CONNECTION_STRING")
    if uri == "" {
    log.Fatal("set your 'ATLAS_CONNECTION_STRING' environment variable.")
    }
    clientOptions := options.Client().ApplyURI(uri)
    client, err := mongo.Connect(ctx, clientOptions)
    if err != nil {
    log.Fatalf("failed to connect to the server: %v", err)
    }
    defer func() { _ = client.Disconnect(ctx) }()
    // Specify the database and collection
    coll := client.Database("rag_db").Collection("test")
    queryEmbedding := GetEmbeddings([]string{query})
    vectorSearchStage := bson.D{
    {"$vectorSearch", bson.D{
    {"index", "vector_index"},
    {"path", "embedding"},
    {"queryVector", queryEmbedding[0]},
    {"exact", true},
    {"limit", 5},
    }}}
    projectStage := bson.D{
    {"$project", bson.D{
    {"_id", 0},
    {"pageContent", 1},
    {"score", bson.D{{"$meta", "vectorSearchScore"}}},
    }}}
    cursor, err := coll.Aggregate(ctx, mongo.Pipeline{vectorSearchStage, projectStage})
    if err != nil {
    log.Fatalf("failed to execute the aggregation pipeline: %v", err)
    }
    var results []TextWithScore
    if err = cursor.All(context.TODO(), &results); err != nil {
    log.Fatalf("failed to connect unmarshal retrieved documents: %v", err)
    }
    return results
    }
  4. Test retrieving the data.

    1. In the rag-mongodb project directory, create a new file called retrieve-documents-test.go. In this step, you check that the function you just defined returns relevant results.

    2. Paste this code into your file:

      retrieve-documents-test.go
      package main
      import (
      "fmt"
      "rag-mongodb/common" // Module that contains the GetQueryResults function
      )
      func main() {
      query := "AI Technology"
      documents := common.GetQueryResults(query)
      for _, doc := range documents {
      fmt.Printf("Text: %s \nScore: %v \n\n", doc.PageContent, doc.Score)
      }
      }
    3. Run the following command to execute the code:

      go run retrieve-documents-test.go
      Text: for the variety and scale of data required by AI-powered applications. We are confident MongoDB will be a substantial beneficiary of this next wave of application development.&#34;
      Score: 0.835033655166626
      Text: &#34;As we look ahead, we continue to be incredibly excited by our large market opportunity, the potential to increase share, and become a standard within more of our customers. We also see a tremendous opportunity to win more legacy workloads, as AI has now become a catalyst to modernize these applications. MongoDB&#39;s document-based architecture is particularly well-suited for the variety and
      Score: 0.8280757665634155
      Text: to the use of new and evolving technologies, such as artificial intelligence, in our offerings or partnerships; the growth and expansion of the market for database products and our ability to penetrate that market; our ability to integrate acquired businesses and technologies successfully or achieve the expected benefits of such acquisitions; our ability to maintain the security of our software
      Score: 0.8165900111198425
      Text: MongoDB continues to expand its AI ecosystem with the announcement of the MongoDB AI Applications Program (MAAP), which provides customers with reference architectures, pre-built partner integrations, and professional services to help them quickly build AI-powered applications. Accenture will establish a center of excellence focused on MongoDB projects, and is the first global systems
      Score: 0.8023912906646729
      Text: Bendigo and Adelaide Bank partnered with MongoDB to modernize their core banking technology. With the help of MongoDB Relational Migrator and generative AI-powered modernization tools, Bendigo and Adelaide Bank decomposed an outdated consumer-servicing application into microservices and migrated off its underlying legacy relational database technology significantly faster and more easily than
      Score: 0.7959681749343872
5

In this section, you generate responses by prompting an LLM to use the retrieved documents as context. This example uses the function you just defined to retrieve matching documents from the database, and additionally:

  • Accesses the Mistral 7B Instruct model from Hugging Face's model hub.

  • Instructs the LLM to include the user's question and retrieved documents in the prompt.

  • Prompts the LLM about MongoDB's latest AI announcements.

  1. Create a new file called generate-responses.go, and paste the following code into it:

    generate-responses.go
    package main
    import (
    "context"
    "fmt"
    "log"
    "rag-mongodb/common" // Module that contains the GetQueryResults function
    "strings"
    "github.com/tmc/langchaingo/llms"
    "github.com/tmc/langchaingo/llms/huggingface"
    "github.com/tmc/langchaingo/prompts"
    )
    func main() {
    ctx := context.Background()
    query := "AI Technology"
    documents := common.GetQueryResults(query)
    var textDocuments strings.Builder
    for _, doc := range documents {
    textDocuments.WriteString(doc.PageContent)
    }
    question := "In a few sentences, what are MongoDB's latest AI announcements?"
    template := prompts.NewPromptTemplate(
    `Answer the following question based on the given context.
    Question: {{.question}}
    Context: {{.context}}`,
    []string{"question", "context"},
    )
    prompt, err := template.Format(map[string]any{
    "question": question,
    "context": textDocuments.String(),
    })
    opts := llms.CallOptions{
    Model: "mistralai/Mistral-7B-Instruct-v0.3",
    MaxTokens: 150,
    Temperature: 0.1,
    }
    llm, err := huggingface.New(huggingface.WithModel("mistralai/Mistral-7B-Instruct-v0.3"))
    if err != nil {
    log.Fatalf("failed to initialize a Hugging Face LLM: %v", err)
    }
    completion, err := llms.GenerateFromSinglePrompt(ctx, llm, prompt, llms.WithOptions(opts))
    if err != nil {
    log.Fatalf("failed to generate a response from the prompt: %v", err)
    }
    response := strings.Split(completion, "\n\n")
    if len(response) == 2 {
    fmt.Printf("Prompt: %v\n\n", response[0])
    fmt.Printf("Response: %v\n", response[1])
    }
    }
  2. Run this command to execute the code. The generated response might vary.

    go run generate-responses.go
    Prompt: Answer the following question based on the given context.
    Question: In a few sentences, what are MongoDB's latest AI announcements?
    Context: for the variety and scale of data required by AI-powered applications. We are confident MongoDB will be a substantial beneficiary of this next wave of application development.&#34;&#34;As we look ahead, we continue to be incredibly excited by our large market opportunity, the potential to increase share, and become a standard within more of our customers. We also see a tremendous opportunity to win more legacy workloads, as AI has now become a catalyst to modernize these applications. MongoDB&#39;s document-based architecture is particularly well-suited for the variety andto the use of new and evolving technologies, such as artificial intelligence, in our offerings or partnerships; the growth and expansion of the market for database products and our ability to penetrate that market; our ability to integrate acquired businesses and technologies successfully or achieve the expected benefits of such acquisitions; our ability to maintain the security of our softwareMongoDB continues to expand its AI ecosystem with the announcement of the MongoDB AI Applications Program (MAAP), which provides customers with reference architectures, pre-built partner integrations, and professional services to help them quickly build AI-powered applications. Accenture will establish a center of excellence focused on MongoDB projects, and is the first global systemsBendigo and Adelaide Bank partnered with MongoDB to modernize their core banking technology. With the help of MongoDB Relational Migrator and generative AI-powered modernization tools, Bendigo and Adelaide Bank decomposed an outdated consumer-servicing application into microservices and migrated off its underlying legacy relational database technology significantly faster and more easily than expected.
    Response: MongoDB's latest AI announcements include the launch of the MongoDB AI Applications Program (MAAP) and a partnership with Accenture to establish a center of excellence focused on MongoDB projects. Additionally, Bendigo and Adelaide Bank have partnered with MongoDB to modernize their core banking technology using MongoDB's AI-powered modernization tools.
1
  1. From your IDE, create a Java project using Maven or Gradle.

  2. Add the following dependencies, depending on your package manager:

    If you are using Maven, add the following dependencies to the dependencies array and Bill of Materials (BOM) to the dependencyManagement array in your project's pom.xml file:

    pom.xml
    <dependencies>
    <!-- MongoDB Java Sync Driver v5.2.0 or later -->
    <dependency>
    <groupId>org.mongodb</groupId>
    <artifactId>mongodb-driver-sync</artifactId>
    <version>[5.2.0,)</version>
    </dependency>
    <!-- Java library for Hugging Face models -->
    <dependency>
    <groupId>dev.langchain4j</groupId>
    <artifactId>langchain4j-hugging-face</artifactId>
    </dependency>
    <!-- Java library for URL Document Loader -->
    <dependency>
    <groupId>dev.langchain4j</groupId>
    <artifactId>langchain4j</artifactId>
    </dependency>
    <!-- Java library for ApachePDFBox Document Parser -->
    <dependency>
    <groupId>dev.langchain4j</groupId>
    <artifactId>langchain4j-document-parser-apache-pdfbox</artifactId>
    </dependency>
    </dependencies>
    <dependencyManagement>
    <dependencies>
    <!-- Bill of Materials (BOM) to manage Java library versions -->
    <dependency>
    <groupId>dev.langchain4j</groupId>
    <artifactId>langchain4j-bom</artifactId>
    <version>0.36.2</version>
    <type>pom</type>
    <scope>import</scope>
    </dependency>
    </dependencies>
    </dependencyManagement>

    If you are using Gradle, add the following Bill of Materials (BOM) and dependencies to the dependencies array in in your project's build.gradle file:

    build.gradle
    dependencies {
    // Bill of Materials (BOM) to manage Java library versions
    implementation platform('dev.langchain4j:langchain4j-bom:0.36.2')
    // MongoDB Java Sync Driver v5.2.0 or later
    implementation 'org.mongodb:mongodb-driver-sync:5.2.0'
    // Java library for Hugging Face models
    implementation 'dev.langchain4j:langchain4j-hugging-face'
    // Java library for URL Document Loader
    implementation 'dev.langchain4j:langchain4j'
    // Java library for Apache PDFBox Document Parser
    implementation 'dev.langchain4j:langchain4j-document-parser-apache-pdfbox'
    }
  3. Run your package manager to install the dependencies to your project.

2

Note

This example sets the variables for the project in the IDE. Production applications might manage environment variables through a deployment configuration, CI/CD pipeline, or secrets manager, but you can adapt the provided code to fit your use case.

In your IDE, create a new configuration template and add the following variables to your project:

  • If you are using IntelliJ IDEA, create a new Application run configuration template, then add your variables as semicolon-separated values in the Environment variables field (for example, FOO=123;BAR=456). Apply the changes and click OK.

    To learn more, see the Create a run/debug configuration from a template section of the IntelliJ IDEA documentation.

  • If you are using Eclipse, create a new Java Application launch configuration, then add each variable as a new key-value pair in the Environment tab. Apply the changes and click OK.

    To learn more, see the Creating a Java application launch configuration section of the Eclipse IDE documentation.

Environment variables
HUGGING_FACE_ACCESS_TOKEN=<access-token>
ATLAS_CONNECTION_STRING=<connection-string>

Update the placeholders with the following values:

  • Replace the <access-token> placeholder value with your Hugging Face access token.

  • Replace the <connection-string> placeholder value with the SRV connection string for your Atlas cluster.

    Your connection string should use the following format:

    mongodb+srv://<db_username>:<db_password>@<clusterName>.<hostname>.mongodb.net
3

Create a file named PDFProcessor.java and paste the following code.

This code defines the following methods:

  • The parsePDFDocument method uses the Apache PDFBox library and LangChain4j URL Document Loader to load and parse a PDF file at a given URL. The method returns the parsed PDF as a langchain4j Document.

  • The splitDocument method splits a given langchain4j Document into chunks according to the specified chunk size (number of characters) and chunk overlap (number of overlapping characters between consecutive chunks). The method returns a list of text segments.

PDFProcessor.java
import dev.langchain4j.data.document.Document;
import dev.langchain4j.data.document.DocumentParser;
import dev.langchain4j.data.document.DocumentSplitter;
import dev.langchain4j.data.document.loader.UrlDocumentLoader;
import dev.langchain4j.data.document.parser.apache.pdfbox.ApachePdfBoxDocumentParser;
import dev.langchain4j.data.document.splitter.DocumentByCharacterSplitter;
import dev.langchain4j.data.segment.TextSegment;
import java.util.List;
public class PDFProcessor {
/** Parses a PDF document from the specified URL, and returns a
* langchain4j Document object.
* */
public static Document parsePDFDocument(String url) {
DocumentParser parser = new ApachePdfBoxDocumentParser();
return UrlDocumentLoader.load(url, parser);
}
/** Splits a parsed langchain4j Document based on the specified chunking
* parameters, and returns an array of text segments.
*/
public static List<TextSegment> splitDocument(Document document) {
int maxChunkSize = 400; // number of characters
int maxChunkOverlap = 20; // number of overlapping characters between consecutive chunks
DocumentSplitter splitter = new DocumentByCharacterSplitter(maxChunkSize, maxChunkOverlap);
return splitter.split(document);
}
}
4

Create a file named EmbeddingProvider.java and paste the following code.

This code defines two methods to generate embeddings for a given input using the mxbai-embed-large-v1 open-source embedding model:

  • Multiple Inputs: The getEmbeddings method accepts an array of text segment inputs (List<TextSegment>), allowing you to create multiple embeddings in a single API call. The method converts the API-provided arrays of floats to BSON arrays of doubles for storing in your Atlas cluster.

  • Single Input: The getEmbedding method accepts a single String, which represents a query you want to make against your vector data. The method converts the API-provided array of floats to a BSON array of doubles to use when querying your collection.

EmbeddingProvider.java
import dev.langchain4j.data.embedding.Embedding;
import dev.langchain4j.data.segment.TextSegment;
import dev.langchain4j.model.huggingface.HuggingFaceChatModel;
import dev.langchain4j.model.huggingface.HuggingFaceEmbeddingModel;
import dev.langchain4j.model.output.Response;
import org.bson.BsonArray;
import org.bson.BsonDouble;
import java.util.List;
import static java.time.Duration.ofSeconds;
public class EmbeddingProvider {
private static HuggingFaceEmbeddingModel embeddingModel;
private static HuggingFaceEmbeddingModel getEmbeddingModel() {
if (embeddingModel == null) {
String accessToken = System.getenv("HUGGING_FACE_ACCESS_TOKEN");
if (accessToken == null || accessToken.isEmpty()) {
throw new RuntimeException("HUGGING_FACE_ACCESS_TOKEN env variable is not set or is empty.");
}
embeddingModel = HuggingFaceEmbeddingModel.builder()
.accessToken(accessToken)
.modelId("mixedbread-ai/mxbai-embed-large-v1")
.waitForModel(true)
.timeout(ofSeconds(60))
.build();
}
return embeddingModel;
}
/**
* Returns the Hugging Face chat model interface used by the createPrompt() method
* to process queries and generate responses.
*/
private static HuggingFaceChatModel chatModel;
public static HuggingFaceChatModel getChatModel() {
String accessToken = System.getenv("HUGGING_FACE_ACCESS_TOKEN");
if (accessToken == null || accessToken.isEmpty()) {
throw new IllegalStateException("HUGGING_FACE_ACCESS_TOKEN env variable is not set or is empty.");
}
if (chatModel == null) {
chatModel = HuggingFaceChatModel.builder()
.timeout(ofSeconds(25))
.modelId("mistralai/Mistral-7B-Instruct-v0.3")
.temperature(0.1)
.maxNewTokens(150)
.accessToken(accessToken)
.waitForModel(true)
.build();
}
return chatModel;
}
/**
* Takes an array of text segments and returns a BSON array of embeddings to
* store in the database.
*/
public List<BsonArray> getEmbeddings(List<TextSegment> texts) {
List<TextSegment> textSegments = texts.stream()
.toList();
Response<List<Embedding>> response = getEmbeddingModel().embedAll(textSegments);
return response.content().stream()
.map(e -> new BsonArray(
e.vectorAsList().stream()
.map(BsonDouble::new)
.toList()))
.toList();
}
/**
* Takes a single string and returns a BSON array embedding to
* use in a vector query.
*/
public static BsonArray getEmbedding(String text) {
Response<Embedding> response = getEmbeddingModel().embed(text);
return new BsonArray(
response.content().vectorAsList().stream()
.map(BsonDouble::new)
.toList());
}
}
5

Create a file named DataIngest.java and paste the following code.

This code uses the LangChain4j library and the MongoDB Java Sync Driver to ingest sample data into Atlas that LLMs don't have access to.

Specifically, this code does the following:

  1. Connects to your Atlas cluster.

  2. Loads and parses the MongoDB earnings report PDF file from the URL using the parsePDFDocument method that you previously defined.

  3. Splits the data into chunks using the splitDocument method that you previously defined.

  4. Creates vector embeddings from the chunked data using the GetEmbeddings method that you previously defined.

  5. Stores the embeddings alongside the chunked data in the rag_db.test collection in your Atlas cluster.

    DataIngest.java
    import com.mongodb.MongoException;
    import com.mongodb.client.MongoClient;
    import com.mongodb.client.MongoClients;
    import com.mongodb.client.MongoCollection;
    import com.mongodb.client.MongoDatabase;
    import com.mongodb.client.result.InsertManyResult;
    import dev.langchain4j.data.segment.TextSegment;
    import org.bson.BsonArray;
    import org.bson.Document;
    import java.util.ArrayList;
    import java.util.List;
    public class DataIngest {
    public static void main(String[] args) {
    String uri = System.getenv("ATLAS_CONNECTION_STRING");
    if (uri == null || uri.isEmpty()) {
    throw new RuntimeException("ATLAS_CONNECTION_STRING env variable is not set or is empty.");
    }
    // establish connection and set namespace
    try (MongoClient mongoClient = MongoClients.create(uri)) {
    MongoDatabase database = mongoClient.getDatabase("rag_db");
    MongoCollection<Document> collection = database.getCollection("test");
    // parse the PDF file at the specified URL
    String url = "https://investors.mongodb.com/node/12236/pdf";
    String fileName = "mongodb_annual_report.pdf";
    System.out.println("Parsing the [" + fileName + "] file from url: " + url);
    dev.langchain4j.data.document.Document parsedDoc = PDFProcessor.parsePDFDocument(url);
    // split (or "chunk") the parsed document into text segments
    List<TextSegment> segments = PDFProcessor.splitDocument(parsedDoc);
    System.out.println(segments.size() + " text segments created successfully.");
    // create vector embeddings from the chunked data (i.e. text segments)
    System.out.println("Creating vector embeddings from the parsed data segments. This may take a few moments.");
    List<Document> documents = embedText(segments);
    // insert the embeddings into the Atlas collection
    try {
    System.out.println("Ingesting data into the " + collection.getNamespace() + " collection.");
    insertDocuments(documents, collection);
    }
    catch (MongoException me) {
    throw new RuntimeException("Failed to insert documents", me);
    }
    } catch (MongoException me) {
    throw new RuntimeException("Failed to connect to MongoDB", me);
    } catch (Exception e) {
    throw new RuntimeException("Operation failed: ", e);
    }
    }
    /**
    * Embeds text segments into vector embeddings using the EmbeddingProvider
    * class and returns a list of BSON documents containing the text and
    * generated embeddings.
    */
    private static List<Document> embedText(List<TextSegment> segments) {
    EmbeddingProvider embeddingProvider = new EmbeddingProvider();
    List<BsonArray> embeddings = embeddingProvider.getEmbeddings(segments);
    List<Document> documents = new ArrayList<>();
    int i = 0;
    for (TextSegment segment : segments) {
    Document doc = new Document("text", segment.text()).append("embedding", embeddings.get(i));
    documents.add(doc);
    i++;
    }
    return documents;
    }
    /**
    * Inserts a list of BSON documents into the specified MongoDB collection.
    */
    private static void insertDocuments(List<Document> documents, MongoCollection<Document> collection) {
    List<String> insertedIds = new ArrayList<>();
    InsertManyResult result = collection.insertMany(documents);
    result.getInsertedIds().values()
    .forEach(doc -> insertedIds.add(doc.toString()));
    System.out.println(insertedIds.size() + " documents inserted into the " + collection.getNamespace() + " collection successfully.");
    }
    }
6

Note

503 when calling Hugging Face models

You may occasionally get 503 errors when calling Hugging Face model hub models. To resolve this issue, retry after a short delay.

Save and run the DataIngest.java file. The output resembles:

Parsing the [mongodb_annual_report.pdf] file from url: https://investors.mongodb.com/node/12236/pdf
72 text segments created successfully.
Creating vector embeddings from the parsed data segments. This may take a few moments...
Ingesting data into the rag_db.test collection.
72 documents inserted into the rag_db.test collection successfully.
7

In this section, you set up Atlas Vector Search to retrieve documents from your vector database.

  1. Create a file named VectorIndex.java and paste the following code.

    This code creates an Atlas Vector Search index on your collection using the following index definition:

    • Index the embedding field in a vector index type for the rag_db.test collection. This field contains the embedding created using the embedding model.

    • Enforce 1024 vector dimensions and measure similarity between vectors using cosine.

    VectorIndex.java
    import com.mongodb.MongoException;
    import com.mongodb.client.ListSearchIndexesIterable;
    import com.mongodb.client.MongoClient;
    import com.mongodb.client.MongoClients;
    import com.mongodb.client.MongoCollection;
    import com.mongodb.client.MongoCursor;
    import com.mongodb.client.MongoDatabase;
    import com.mongodb.client.model.SearchIndexModel;
    import com.mongodb.client.model.SearchIndexType;
    import org.bson.Document;
    import org.bson.conversions.Bson;
    import java.util.Collections;
    import java.util.List;
    public class VectorIndex {
    public static void main(String[] args) {
    String uri = System.getenv("ATLAS_CONNECTION_STRING");
    if (uri == null || uri.isEmpty()) {
    throw new IllegalStateException("ATLAS_CONNECTION_STRING env variable is not set or is empty.");
    }
    // establish connection and set namespace
    try (MongoClient mongoClient = MongoClients.create(uri)) {
    MongoDatabase database = mongoClient.getDatabase("rag_db");
    MongoCollection<Document> collection = database.getCollection("test");
    // define the index details for the index model
    String indexName = "vector_index";
    Bson definition = new Document(
    "fields",
    Collections.singletonList(
    new Document("type", "vector")
    .append("path", "embedding")
    .append("numDimensions", 1024)
    .append("similarity", "cosine")));
    SearchIndexModel indexModel = new SearchIndexModel(
    indexName,
    definition,
    SearchIndexType.vectorSearch());
    // create the index using the defined model
    try {
    List<String> result = collection.createSearchIndexes(Collections.singletonList(indexModel));
    System.out.println("Successfully created vector index named: " + result);
    System.out.println("It may take up to a minute for the index to build before you can query using it.");
    } catch (Exception e) {
    throw new RuntimeException(e);
    }
    // wait for Atlas to build the index and make it queryable
    System.out.println("Polling to confirm the index has completed building.");
    waitForIndexReady(collection, indexName);
    } catch (MongoException me) {
    throw new RuntimeException("Failed to connect to MongoDB", me);
    } catch (Exception e) {
    throw new RuntimeException("Operation failed: ", e);
    }
    }
    /**
    * Polls the collection to check whether the specified index is ready to query.
    */
    public static void waitForIndexReady(MongoCollection<Document> collection, String indexName) throws InterruptedException {
    ListSearchIndexesIterable<Document> searchIndexes = collection.listSearchIndexes();
    while (true) {
    try (MongoCursor<Document> cursor = searchIndexes.iterator()) {
    if (!cursor.hasNext()) {
    break;
    }
    Document current = cursor.next();
    String name = current.getString("name");
    boolean queryable = current.getBoolean("queryable");
    if (name.equals(indexName) && queryable) {
    System.out.println(indexName + " index is ready to query");
    return;
    } else {
    Thread.sleep(500);
    }
    }
    }
    }
    }
  2. Create the Atlas Vector Search index.

    Save and run the file. The output resembles:

    Successfully created a vector index named: [vector_index]
    Polling to confirm the index has completed building.
    It may take up to a minute for the index to build before you can query using it.
    vector_index index is ready to query
8

In this section, you generate responses by prompting an LLM to use the retrieved documents as context.

Create a new file called LLMPrompt.java, and paste the following code into it.

This code does the following:

  1. Queries the rag_db.test collection for any matching documents using a retrieveDocuments method.

    This method uses the getEmbedding method that you created earlier to generate an embedding from the search query, then runs the query to return semantically-similar documents.

    To learn more, refer to Run Vector Search Queries.

  2. Accesses the Mistral 7B Instruct model from Hugging Face's model hub, and creates a templated prompt using a createPrompt method.

    The method instructs the LLM to include the user's question and retrieved documents in the defined prompt.

  3. Prompts the LLM about MongoDB's latest AI announcements, then returns a generated response.

    LLMPrompt.java
    import com.mongodb.MongoException;
    import com.mongodb.client.MongoClient;
    import com.mongodb.client.MongoClients;
    import com.mongodb.client.MongoCollection;
    import com.mongodb.client.MongoDatabase;
    import com.mongodb.client.model.search.FieldSearchPath;
    import dev.langchain4j.data.message.AiMessage;
    import dev.langchain4j.model.huggingface.HuggingFaceChatModel;
    import dev.langchain4j.model.input.Prompt;
    import dev.langchain4j.model.input.PromptTemplate;
    import org.bson.BsonArray;
    import org.bson.BsonValue;
    import org.bson.Document;
    import org.bson.conversions.Bson;
    import java.util.ArrayList;
    import java.util.HashMap;
    import java.util.List;
    import java.util.Map;
    import static com.mongodb.client.model.Aggregates.project;
    import static com.mongodb.client.model.Aggregates.vectorSearch;
    import static com.mongodb.client.model.Projections.exclude;
    import static com.mongodb.client.model.Projections.fields;
    import static com.mongodb.client.model.Projections.include;
    import static com.mongodb.client.model.Projections.metaVectorSearchScore;
    import static com.mongodb.client.model.search.SearchPath.fieldPath;
    import static com.mongodb.client.model.search.VectorSearchOptions.exactVectorSearchOptions;
    import static java.util.Arrays.asList;
    public class LLMPrompt {
    // User input: the question to answer
    static String question = "In a few sentences, what are MongoDB's latest AI announcements?";
    public static void main(String[] args) {
    String uri = System.getenv("ATLAS_CONNECTION_STRING");
    if (uri == null || uri.isEmpty()) {
    throw new IllegalStateException("ATLAS_CONNECTION_STRING env variable is not set or is empty.");
    }
    // establish connection and set namespace
    try (MongoClient mongoClient = MongoClients.create(uri)) {
    MongoDatabase database = mongoClient.getDatabase("rag_db");
    MongoCollection<Document> collection = database.getCollection("test");
    // generate a response to the user question
    try {
    createPrompt(question, collection);
    } catch (Exception e) {
    throw new RuntimeException("An error occurred while generating the response: ", e);
    }
    } catch (MongoException me) {
    throw new RuntimeException("Failed to connect to MongoDB ", me);
    } catch (Exception e) {
    throw new RuntimeException("Operation failed: ", e);
    }
    }
    /**
    * Returns a list of documents from the specified MongoDB collection that
    * match the user's question.
    * NOTE: Update or omit the projection stage to change the desired fields in the response
    */
    public static List<Document> retrieveDocuments(String question, MongoCollection<Document> collection) {
    try {
    // generate the query embedding to use in the vector search
    BsonArray queryEmbeddingBsonArray = EmbeddingProvider.getEmbedding(question);
    List<Double> queryEmbedding = new ArrayList<>();
    for (BsonValue value : queryEmbeddingBsonArray.stream().toList()) {
    queryEmbedding.add(value.asDouble().getValue());
    }
    // define the pipeline stages for the vector search index
    String indexName = "vector_index";
    FieldSearchPath fieldSearchPath = fieldPath("embedding");
    int limit = 5;
    List<Bson> pipeline = asList(
    vectorSearch(
    fieldSearchPath,
    queryEmbedding,
    indexName,
    limit,
    exactVectorSearchOptions()),
    project(
    fields(
    exclude("_id"),
    include("text"),
    metaVectorSearchScore("score"))));
    // run the query and return the matching documents
    List<Document> matchingDocuments = new ArrayList<>();
    collection.aggregate(pipeline).forEach(matchingDocuments::add);
    return matchingDocuments;
    } catch (Exception e) {
    System.err.println("Error occurred while retrieving documents: " + e.getMessage());
    return new ArrayList<>();
    }
    }
    /**
    * Creates a templated prompt from a submitted question string and any retrieved documents,
    * then generates a response using the Hugging Face chat model.
    */
    public static void createPrompt(String question, MongoCollection<Document> collection) {
    // retrieve documents matching the user's question
    List<Document> retrievedDocuments = retrieveDocuments(question, collection);
    if (retrievedDocuments.isEmpty()) {
    System.out.println("No relevant documents found. Unable to generate a response.");
    return;
    } else
    System.out.println("Generating a response from the retrieved documents. This may take a few moments.");
    // define a prompt template
    HuggingFaceChatModel huggingFaceChatModel = EmbeddingProvider.getChatModel();
    PromptTemplate promptBuilder = PromptTemplate.from("""
    Answer the following question based on the given context:
    Question: {{question}}
    Context: {{information}}
    -------
    """);
    // build the information string from the retrieved documents
    StringBuilder informationBuilder = new StringBuilder();
    for (Document doc : retrievedDocuments) {
    String text = doc.getString("text");
    informationBuilder.append(text).append("\n");
    }
    Map<String, Object> variables = new HashMap<>();
    variables.put("question", question);
    variables.put("information", informationBuilder);
    // generate and output the response from the chat model
    Prompt prompt = promptBuilder.apply(variables);
    AiMessage response = huggingFaceChatModel.generate(prompt.toUserMessage()).content();
    // extract the generated text to output a formatted response
    String responseText = response.text();
    String marker = "-------";
    int markerIndex = responseText.indexOf(marker);
    String generatedResponse;
    if (markerIndex != -1) {
    generatedResponse = responseText.substring(markerIndex + marker.length()).trim();
    } else {
    generatedResponse = responseText; // else fallback to the full response
    }
    // output the question and formatted response
    System.out.println("Question:\n " + question);
    System.out.println("Response:\n " + generatedResponse);
    // output the filled-in prompt and context information for demonstration purposes
    System.out.println("\n" + "---- Prompt Sent to LLM ----");
    System.out.println(prompt.text() + "\n");
    }
    }
9

Save and run the file. The output resembles the following, but note that the generated response might vary.

Generating a response from the retrieved documents. This may take a few moments.
Question:
In a few sentences, what are MongoDB's latest AI announcements?
Response:
MongoDB's latest AI announcements include the MongoDB AI Applications Program (MAAP), which provides customers with reference architectures, pre-built partner integrations, and professional services to help them quickly build AI-powered applications. Accenture will establish a center of excellence focused on MongoDB projects. These announcements highlight MongoDB's growing focus on AI application development and its potential to modernize legacy workloads.
---- Prompt Sent to LLM ----
Answer the following question based on the given context:
Question: In a few sentences, what are MongoDB's latest AI announcements?
Context: time data.
MongoDB continues to expand its AI ecosystem with the announcement of the MongoDB AI Applications Program (MAAP),
which provides customers with reference architectures, pre-built partner integrations, and professional services to help
them quickly build AI-powered applications. Accenture will establish a center of excellence focused on MongoDB projects,
and is the first global systems i
ighlights
MongoDB announced a number of new products and capabilities at MongoDB.local NYC. Highlights included the preview
of MongoDB 8.0—with significant performance improvements such as faster reads and updates, along with significantly
faster bulk inserts and time series queries—and the general availability of Atlas Stream Processing to build sophisticated,
event-driven applications with real-
ble future as well as the criticality of MongoDB to artificial intelligence application development. These forward-looking
statements include, but are not limited to, plans, objectives, expectations and intentions and other statements contained in this press release that are
not historical facts and statements identified by words such as "anticipate," "believe," "continue," "could," "estimate," "e
ve Officer of MongoDB.
"As we look ahead, we continue to be incredibly excited by our large market opportunity, the potential to increase share, and become a standard within
more of our customers. We also see a tremendous opportunity to win more legacy workloads, as AI has now become a catalyst to modernize these
applications. MongoDB's document-based architecture is particularly well-suited for t
ictable, impact on its future GAAP financial results.
Conference Call Information
MongoDB will host a conference call today, May 30, 2024, at 5:00 p.m. (Eastern Time) to discuss its financial results and business outlook. A live
webcast of the call will be available on the "Investor Relations" page of MongoDB's website at https://investors.mongodb.com. To access the call by
phone, please go to thi
1
  1. Initialize your Node.js project.

    Run the following commands in your terminal to create a new directory named rag-mongodb and initialize your project:

    mkdir rag-mongodb
    cd rag-mongodb
    npm init -y
  2. Install and import dependencies.

    Run the following command:

    npm install mongodb langchain @langchain/community @xenova/transformers @huggingface/inference pdf-parse
  3. Update your package.json file.

    In your project's package.json file, specify the type field as shown in the following example, and then save the file.

    {
    "name": "rag-mongodb",
    "type": "module",
    ...
  4. Create a .env file.

    In your project, create a .env file to store your Atlas connection string and Hugging Face access token.

    HUGGING_FACE_ACCESS_TOKEN = "<access-token>"
    ATLAS_CONNECTION_STRING = "<connection-string>"
    Replace the ``<access-token>`` placeholder value with your Hugging Face access token.
    .. include:: /includes/avs-examples/shared/avs-replace-connection-string.rst

    Note

    Minimum Node.js Version Requirements

    Node.js v20.x introduced the --env-file option. If you are using an older version of Node.js, add the dotenv package to your project, or use a different method to manage your environment variables.

2

In this section, you create a function that:

  • Loads the nomic-embed-text-v1 embedding model from Hugging Face's model hub.

  • Creates vector embeddings from the inputted data.

Create a file called get-embeddings.js in your project, and paste the following code:

import { pipeline } from '@xenova/transformers';
// Function to generate embeddings for a given data source
export async function getEmbedding(data) {
const embedder = await pipeline(
'feature-extraction',
'Xenova/nomic-embed-text-v1');
const results = await embedder(data, { pooling: 'mean', normalize: true });
return Array.from(results.data);
}
3

In this section, you ingest sample data into Atlas that LLMs don't have access to. The following code uses the LangChain integration and Node.js driver to do the following:

  • Load a PDF that contains a MongoDB earnings report.

  • Split the data into chunks, specifying the chunk size (number of characters) and chunk overlap (number of overlapping characters between consecutive chunks).

  • Create vector embeddings from the chunked data by using the getEmbeddings function that you defined.

  • Store these embeddings alongside the chunked data in the rag_db.test collection in your Atlas cluster.

Create a file called ingest-data.js in your project, and paste the following code:

import { PDFLoader } from "@langchain/community/document_loaders/fs/pdf";
import { RecursiveCharacterTextSplitter } from "langchain/text_splitter";
import { MongoClient } from 'mongodb';
import { getEmbeddings } from './get-embeddings.js';
import * as fs from 'fs';
async function run() {
const client = new MongoClient(process.env.ATLAS_CONNECTION_STRING);
try {
// Save online PDF as a file
const rawData = await fetch("https://investors.mongodb.com/node/12236/pdf");
const pdfBuffer = await rawData.arrayBuffer();
const pdfData = Buffer.from(pdfBuffer);
fs.writeFileSync("investor-report.pdf", pdfData);
const loader = new PDFLoader(`investor-report.pdf`);
const data = await loader.load();
// Chunk the text from the PDF
const textSplitter = new RecursiveCharacterTextSplitter({
chunkSize: 400,
chunkOverlap: 20,
});
const docs = await textSplitter.splitDocuments(data);
console.log(`Successfully chunked the PDF into ${docs.length} documents.`);
// Connect to your Atlas cluster
await client.connect();
const db = client.db("rag_db");
const collection = db.collection("test");
console.log("Generating embeddings and inserting documents.");
let docCount = 0;
await Promise.all(docs.map(async doc => {
const embeddings = await getEmbeddings(doc.pageContent);
// Insert the embeddings and the chunked PDF data into Atlas
await collection.insertOne({
document: doc,
embedding: embeddings,
});
docCount += 1;
}))
console.log(`Successfully inserted ${docCount} documents.`);
} catch (err) {
console.log(err.stack);
}
finally {
await client.close();
}
}
run().catch(console.dir);

Then, run the following command to execute the code:

node --env-file=.env ingest-data.js

Tip

This code takes some time to run. You can view your vector embeddings as they're inserted by navigating to the rag_db.test collection in the Atlas UI.

4

In this section, you set up Atlas Vector Search to retrieve documents from your vector database. Complete the following steps:

  1. Create an Atlas Vector Search index on your vector embeddings.

    Create a new file named rag-vector-index.js and paste the following code. This code connects to your Atlas cluster and creates an index of the vectorSearch type on the rag_db.test collection.

    import { MongoClient } from 'mongodb';
    // Connect to your Atlas cluster
    const client = new MongoClient(process.env.ATLAS_CONNECTION_STRING);
    async function run() {
    try {
    const database = client.db("rag_db");
    const collection = database.collection("test");
    // Define your Atlas Vector Search index
    const index = {
    name: "vector_index",
    type: "vectorSearch",
    definition: {
    "fields": [
    {
    "type": "vector",
    "numDimensions": 768,
    "path": "embedding",
    "similarity": "cosine"
    }
    ]
    }
    }
    // Call the method to create the index
    const result = await collection.createSearchIndex(index);
    console.log(result);
    } finally {
    await client.close();
    }
    }
    run().catch(console.dir);

    Then, run the following command to execute the code:

    node --env-file=.env rag-vector-index.js
  2. Define a function to retrieve relevant data.

    Create a new file called retrieve-documents.js.

    In this step, you create a retrieval function called getQueryResults that runs a query to retrieve relevant documents. It uses the getEmbeddings function to create embeddings from the search query. Then, it runs the query to return semantically-similar documents.

    To learn more, refer to Run Vector Search Queries.

    Paste this code into your file:

    import { MongoClient } from 'mongodb';
    import { getEmbeddings } from './get-embeddings.js';
    // Function to get the results of a vector query
    export async function getQueryResults(query) {
    // Connect to your Atlas cluster
    const client = new MongoClient(process.env.ATLAS_CONNECTION_STRING);
    try {
    // Get embeddings for a query
    const queryEmbeddings = await getEmbeddings(query);
    await client.connect();
    const db = client.db("rag_db");
    const collection = db.collection("test");
    const pipeline = [
    {
    $vectorSearch: {
    index: "vector_index",
    queryVector: queryEmbeddings,
    path: "embedding",
    exact: true,
    limit: 5
    }
    },
    {
    $project: {
    _id: 0,
    document: 1,
    }
    }
    ];
    // Retrieve documents from Atlas using this Vector Search query
    const result = collection.aggregate(pipeline);
    const arrayOfQueryDocs = [];
    for await (const doc of result) {
    arrayOfQueryDocs.push(doc);
    }
    return arrayOfQueryDocs;
    } catch (err) {
    console.log(err.stack);
    }
    finally {
    await client.close();
    }
    }
  3. Test retrieving the data.

    Create a new file called retrieve-documents-test.js. In this step, you check that the function you just defined returns relevant results.

    Paste this code into your file:

    import { getQueryResults } from './retrieve-documents.js';
    async function run() {
    try {
    const query = "AI Technology";
    const documents = await getQueryResults(query);
    documents.forEach( doc => {
    console.log(doc);
    });
    } catch (err) {
    console.log(err.stack);
    }
    }
    run().catch(console.dir);

    Then, run the following command to execute the code:

    node --env-file=.env retrieve-documents-test.js
    {
    document: {
    pageContent: 'MongoDB continues to expand its AI ecosystem with the announcement of the MongoDB AI Applications Program (MAAP),',
    metadata: { source: 'investor-report.pdf', pdf: [Object], loc: [Object] },
    id: null
    }
    }
    {
    document: {
    pageContent: 'artificial intelligence, in our offerings or partnerships; the growth and expansion of the market for database products and our ability to penetrate that\n' +
    'market; our ability to integrate acquired businesses and technologies successfully or achieve the expected benefits of such acquisitions; our ability to',
    metadata: { source: 'investor-report.pdf', pdf: [Object], loc: [Object] },
    id: null
    }
    }
    {
    document: {
    pageContent: 'more of our customers. We also see a tremendous opportunity to win more legacy workloads, as AI has now become a catalyst to modernize these\n' +
    "applications. MongoDB's document-based architecture is particularly well-suited for the variety and scale of data required by AI-powered applications. \n" +
    'We are confident MongoDB will be a substantial beneficiary of this next wave of application development."',
    metadata: { source: 'investor-report.pdf', pdf: [Object], loc: [Object] },
    id: null
    }
    }
    {
    document: {
    pageContent: 'which provides customers with reference architectures, pre-built partner integrations, and professional services to help\n' +
    'them quickly build AI-powered applications. Accenture will establish a center of excellence focused on MongoDB projects,\n' +
    'and is the first global systems integrator to join MAAP.',
    metadata: { source: 'investor-report.pdf', pdf: [Object], loc: [Object] },
    id: null
    }
    }
    {
    document: {
    pageContent: 'Bendigo and Adelaide Bank partnered with MongoDB to modernize their core banking technology. With the help of\n' +
    'MongoDB Relational Migrator and generative AI-powered modernization tools, Bendigo and Adelaide Bank decomposed an\n' +
    'outdated consumer-servicing application into microservices and migrated off its underlying legacy relational database',
    metadata: { source: 'investor-report.pdf', pdf: [Object], loc: [Object] },
    id: null
    }
    }
5

In this section, you generate responses by prompting an LLM to use the retrieved documents as context. This example uses the function you just defined to retrieve matching documents from the database, and additionally:

  • Accesses the Mistral 7B Instruct model from Hugging Face's model hub.

  • Instructs the LLM to include the user's question and retrieved documents in the prompt.

  • Prompts the LLM about MongoDB's latest AI announcements.

Create a new file called generate-responses.js, and paste the following code into it:

import { getQueryResults } from './retrieve-documents.js';
import { HfInference } from '@huggingface/inference'
async function run() {
try {
// Specify search query and retrieve relevant documents
const query = "AI Technology";
const documents = await getQueryResults(query);
// Build a string representation of the retrieved documents to use in the prompt
let textDocuments = "";
documents.forEach(doc => {
textDocuments += doc.document.pageContent;
});
const question = "In a few sentences, what are MongoDB's latest AI announcements?";
// Create a prompt consisting of the question and context to pass to the LLM
const prompt = `Answer the following question based on the given context.
Question: {${question}}
Context: {${textDocuments}}
`;
// Connect to Hugging Face, using the access token from the environment file
const hf = new HfInference(process.env.HUGGING_FACE_ACCESS_TOKEN);
const llm = hf.endpoint(
"https://api-inference.huggingface.co/models/mistralai/Mistral-7B-Instruct-v0.3"
);
// Prompt the LLM to answer the question using the
// retrieved documents as the context
const output = await llm.chatCompletion({
model: "mistralai/Mistral-7B-Instruct-v0.2",
messages: [{ role: "user", content: prompt }],
max_tokens: 150,
});
// Output the LLM's response as text.
console.log(output.choices[0].message.content);
} catch (err) {
console.log(err.stack);
}
}
run().catch(console.dir);

Then, run this command to execute the code. The generated response might vary.

node --env-file=.env generate-responses.js
MongoDB's latest AI announcements include the launch of the MongoDB
AI Applications Program (MAAP), which provides customers with
reference architectures, pre-built partner integrations, and
professional services to help them build AI-powered applications
quickly. Accenture has joined MAAP as the first global systems
integrator, establishing a center of excellence focused on MongoDB
projects. Additionally, Bendigo and Adelaide Bank have partnered
with MongoDB to modernize their core banking technology using
MongoDB's Relational Migrator and generative AI-powered
modernization tools.
1

Create an interactive Python notebook by saving a file with the .ipynb extension. This notebook allows you to run Python code snippets individually. In your notebook, run the following code to install the dependencies for this tutorial:

pip install --quiet --upgrade pymongo sentence_transformers einops langchain langchain_community pypdf huggingface_hub
2

In this section, you ingest sample data into Atlas that LLMs don't have access to. Paste and run each of the following code snippets in your notebook:

  1. Define a function to generate vector embeddings.

    Run this code to create a function that generates vector embeddings by using an open-source embedding model. Specifically, this code does the following:

    from sentence_transformers import SentenceTransformer
    # Load the embedding model (https://huggingface.co/nomic-ai/nomic-embed-text-v1")
    model = SentenceTransformer("nomic-ai/nomic-embed-text-v1", trust_remote_code=True)
    # Define a function to generate embeddings
    def get_embedding(data):
    """Generates vector embeddings for the given data."""
    embedding = model.encode(data)
    return embedding.tolist()
  2. Load and split the data.

    Run this code to load and split sample data by using the LangChain integration. Specifically, this code does the following:

    • Loads a PDF that contains a MongoDB earnings report.

    • Splits the data into chunks, specifying the chunk size (number of characters) and chunk overlap (number of overlapping characters between consecutive chunks).

    from langchain_community.document_loaders import PyPDFLoader
    from langchain.text_splitter import RecursiveCharacterTextSplitter
    # Load the PDF
    loader = PyPDFLoader("https://investors.mongodb.com/node/12236/pdf")
    data = loader.load()
    # Split the data into chunks
    text_splitter = RecursiveCharacterTextSplitter(chunk_size=400, chunk_overlap=20)
    documents = text_splitter.split_documents(data)
  3. Convert the data to vector embeddings.

    Run this code to prepare the chunked documents for ingestion by creating a list of documents with their corresponding vector embeddings. You generate these embeddings by using the get_embedding function that you just defined.

    # Prepare documents for insertion
    docs_to_insert = [{
    "text": doc.page_content,
    "embedding": get_embedding(doc.page_content)
    } for doc in documents]
  4. Store the data and embeddings in Atlas

    Run this code to insert the documents containing the embeddings into the rag_db.test collection in your Atlas cluster. Before running the code, replace <connection-string> with your Atlas connection string.

    from pymongo import MongoClient
    # Connect to your Atlas cluster
    client = MongoClient("<connection-string>")
    collection = client["rag_db"]["test"]
    # Insert documents into the collection
    result = collection.insert_many(docs_to_insert)

    Tip

    After you run the code, you can view your vector embeddings in the Atlas UI by navigating to the rag_db.test collection in your cluster.

3

In this section, you create a retrieval system using Atlas Vector Search to get relevant documents from your vector database. Paste and run each of the following code snippets in your notebook:

  1. Create an Atlas Vector Search index on your vector embeddings.

    Run the following code to create the index directly from your application with the PyMongo Driver. This code also includes a polling mechanism to check if the index is ready to use.

    To learn more, see How to Index Fields for Vector Search.

    from pymongo.operations import SearchIndexModel
    import time
    # Create your index model, then create the search index
    index_name="vector_index"
    search_index_model = SearchIndexModel(
    definition = {
    "fields": [
    {
    "type": "vector",
    "numDimensions": 768,
    "path": "embedding",
    "similarity": "cosine"
    }
    ]
    },
    name = index_name,
    type = "vectorSearch"
    )
    collection.create_search_index(model=search_index_model)
    # Wait for initial sync to complete
    print("Polling to check if the index is ready. This may take up to a minute.")
    predicate=None
    if predicate is None:
    predicate = lambda index: index.get("queryable") is True
    while True:
    indices = list(collection.list_search_indexes(index_name))
    if len(indices) and predicate(indices[0]):
    break
    time.sleep(5)
    print(index_name + " is ready for querying.")
  2. Define a function to run vector search queries.

    Run this code to create a retrieval function called get_query_results that runs a basic vector search query. It uses the get_embedding function to create embeddings from the search query. Then, it runs the query to return semantically similar documents.

    To learn more, see Run Vector Search Queries.

    # Define a function to run vector search queries
    def get_query_results(query):
    """Gets results from a vector search query."""
    query_embedding = get_embedding(query)
    pipeline = [
    {
    "$vectorSearch": {
    "index": "vector_index",
    "queryVector": query_embedding,
    "path": "embedding",
    "exact": True,
    "limit": 5
    }
    }, {
    "$project": {
    "_id": 0,
    "text": 1
    }
    }
    ]
    results = collection.aggregate(pipeline)
    array_of_results = []
    for doc in results:
    array_of_results.append(doc)
    return array_of_results
    # Test the function with a sample query
    import pprint
    pprint.pprint(get_query_results("AI technology"))
    [{'text': 'more of our customers. We also see a tremendous opportunity to win '
    'more legacy workloads, as AI has now become a catalyst to modernize '
    'these\n'
    "applications. MongoDB's document-based architecture is "
    'particularly well-suited for the variety and scale of data required '
    'by AI-powered applications.'},
    {'text': 'artificial intelligence, in our offerings or partnerships; the '
    'growth and expansion of the market for database products and our '
    'ability to penetrate that\n'
    'market; our ability to integrate acquired businesses and '
    'technologies successfully or achieve the expected benefits of such '
    'acquisitions; our ability to'},
    {'text': 'MongoDB continues to expand its AI ecosystem with the announcement '
    'of the MongoDB AI Applications Program (MAAP),'},
    {'text': 'which provides customers with reference architectures, pre-built '
    'partner integrations, and professional services to help\n'
    'them quickly build AI-powered applications. Accenture will '
    'establish a center of excellence focused on MongoDB projects,\n'
    'and is the first global systems integrator to join MAAP.'},
    {'text': 'Bendigo and Adelaide Bank partnered with MongoDB to modernize '
    'their core banking technology. With the help of\n'
    'MongoDB Relational Migrator and generative AI-powered modernization '
    'tools, Bendigo and Adelaide Bank decomposed an\n'
    'outdated consumer-servicing application into microservices and '
    'migrated off its underlying legacy relational database'}]
4

In this section, you generate responses by prompting an LLM to use the retrieved documents as context.

Replace <token> in the following code with your Hugging Face access token, and then run the code in your notebook. This code does the following:

  • Uses the get_query_results function you defined to retrieve relevant documents from Atlas.

  • Creates a prompt using the user's question and retrieved documents as context.

  • Accesses the Mistral 7B Instruct model from Hugging Face's model hub.

  • Prompts the LLM about MongoDB's latest AI announcements. The generated response might vary.

import os
from huggingface_hub import InferenceClient
# Specify search query, retrieve relevant documents, and convert to string
query = "What are MongoDB's latest AI announcements?"
context_docs = get_query_results(query)
context_string = " ".join([doc["text"] for doc in context_docs])
# Construct prompt for the LLM using the retrieved documents as the context
prompt = f"""Use the following pieces of context to answer the question at the end.
{context_string}
Question: {query}
"""
# Authenticate to Hugging Face and access the model
os.environ["HF_TOKEN"] = "<token>"
llm = InferenceClient(
"mistralai/Mistral-7B-Instruct-v0.3",
token = os.getenv("HF_TOKEN"))
# Prompt the LLM (this code varies depending on the model you use)
output = llm.chat_completion(
messages=[{"role": "user", "content": prompt}],
max_tokens=150
)
print(output.choices[0].message.content)
MongoDB's latest AI announcements include the
MongoDB AI Applications Program (MAAP), a program designed
to help customers build AI-powered applications more efficiently.
Additionally, they have announced significant performance
improvements in MongoDB 8.0, featuring faster reads, updates,
bulk inserts, and time series queries. Another announcement is the
general availability of Atlas Stream Processing to build sophisticated,
event-driven applications with real-time data.

For more detailed RAG tutorials, see the following resources:

To start building production-ready chatbots with Atlas Vector Search, you can use the MongoDB Chatbot Framework. This framework provides a set of libraries that enable you to quickly build AI chatbot applications.

To optimize and fine-tune your RAG applications, see How to Measure the Accuracy of Your Query Results and Improve Vector Search Performance.

You can also experiment with different embedding models, chunking strategies, and LLMs. To learn more, see the following resources:

Additionally, Atlas Vector Search supports advanced retrieval systems. Because you can seamlessly index vector data along with your other data in Atlas, you can fine-tune your retrieval results by pre-filtering on other fields in your collection or performing hybrid search to combine semantic search with full-text search results.

Back

Vector Quantization