Tutorial: Build a Movie Search Engine Using Atlas Full-Text Search in 10 Minutes
Rate this tutorial
Giving your users the ability to find exactly what they are looking for in your application is critical for a fantastic user experience. With the new MongoDB Atlas Full-Text Search service, we have made it easier than ever to integrate simple yet sophisticated search capabilities into your MongoDB applications. To demonstrate just how easy it is, let's build a movie search engine - in only 10 minutes.
Built on Apache Lucene, Full-Text Search adds document data to a full-text search index to make that data searchable in a highly performant, scalable manner. This tutorial will guide you through how to build a web application to search for movies based on a topic using Atlas' sample movie data collection on a free tier cluster. We will create a Full-Text Search index on that sample data. Then we will query on this index to filter, rank and sort through those movies to quickly surface movies by topic.
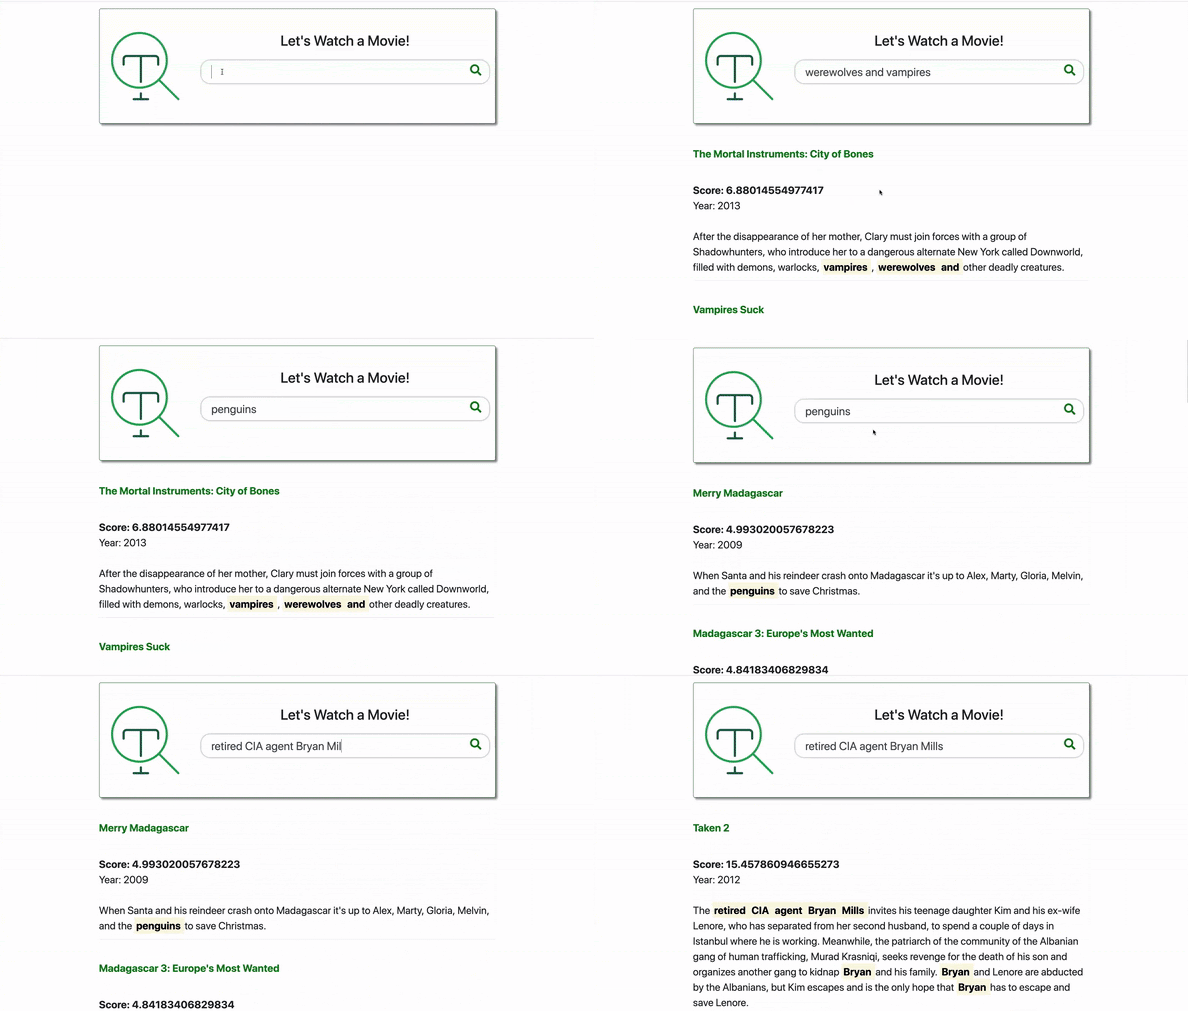
Armed with a basic knowledge of HTML and Javascript, here are the tasks we will accomplish:
- ⬜ Spin up an Atlas cluster and load sample movie data
- ⬜ Create a Full-Text Search index in movie data collection
- ⬜ Write an aggregation pipeline with $searchBeta operator
- ⬜ Create a RESTful API to access data
- ⬜ Call from the front end
Now break out the popcorn, and get ready to find that movie that has been sitting on the tip of your tongue for weeks.

To Get Started, we will need:
- A free tier (M0) cluster on MongoDB Atlas. Click here to sign up for an account and deploy your free cluster on your preferred cloud provider and region.
- The Atlas sample dataset loaded into your cluster. You can load the sample dataset by clicking the ellipse button and Load Sample Dataset.
 For more detailed information on how to spin up a cluster, configure your IP address, create a user, and load sample data, check out Getting Started with MongoDB Atlas from our documentation.
 - (Optional) MongoDB Compass. This is the free GUI for MongoDB that allows you to make smarter decisions about document structure, querying, indexing, document validation, and more. The latest version can be found here https://www.mongodb.com/download-center/compass.
Once your sample dataset is loaded into your database, let's have a closer look to see what we are working within the Atlas Data Explorer. In your Atlas UI, click on Collections to examine the
movies collection in the new sample_mflix database. This collection has over 23k movie documents with information such as title, plot, and cast.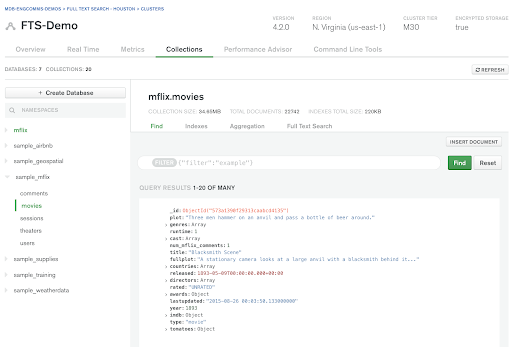
- ✅ Spin up an Atlas cluster and load sample movie data
- ⬜ Create a Full-Text Search index in movie data collection
- ⬜ Write an aggregation pipeline with $searchBeta operator
- ⬜ Create a RESTful API to access data
- ⬜ Call from the front end
Our movie search engine is going to look for movies based on a topic. We will use Full-Text Search to query for specific words and phrases in the 'fullplot' field.
The first thing we need is a Full-Text Search index. Click on the tab titled SearchBETA under Collections. Clicking on the green Create a Search Index button will open a dialog that looks like this:
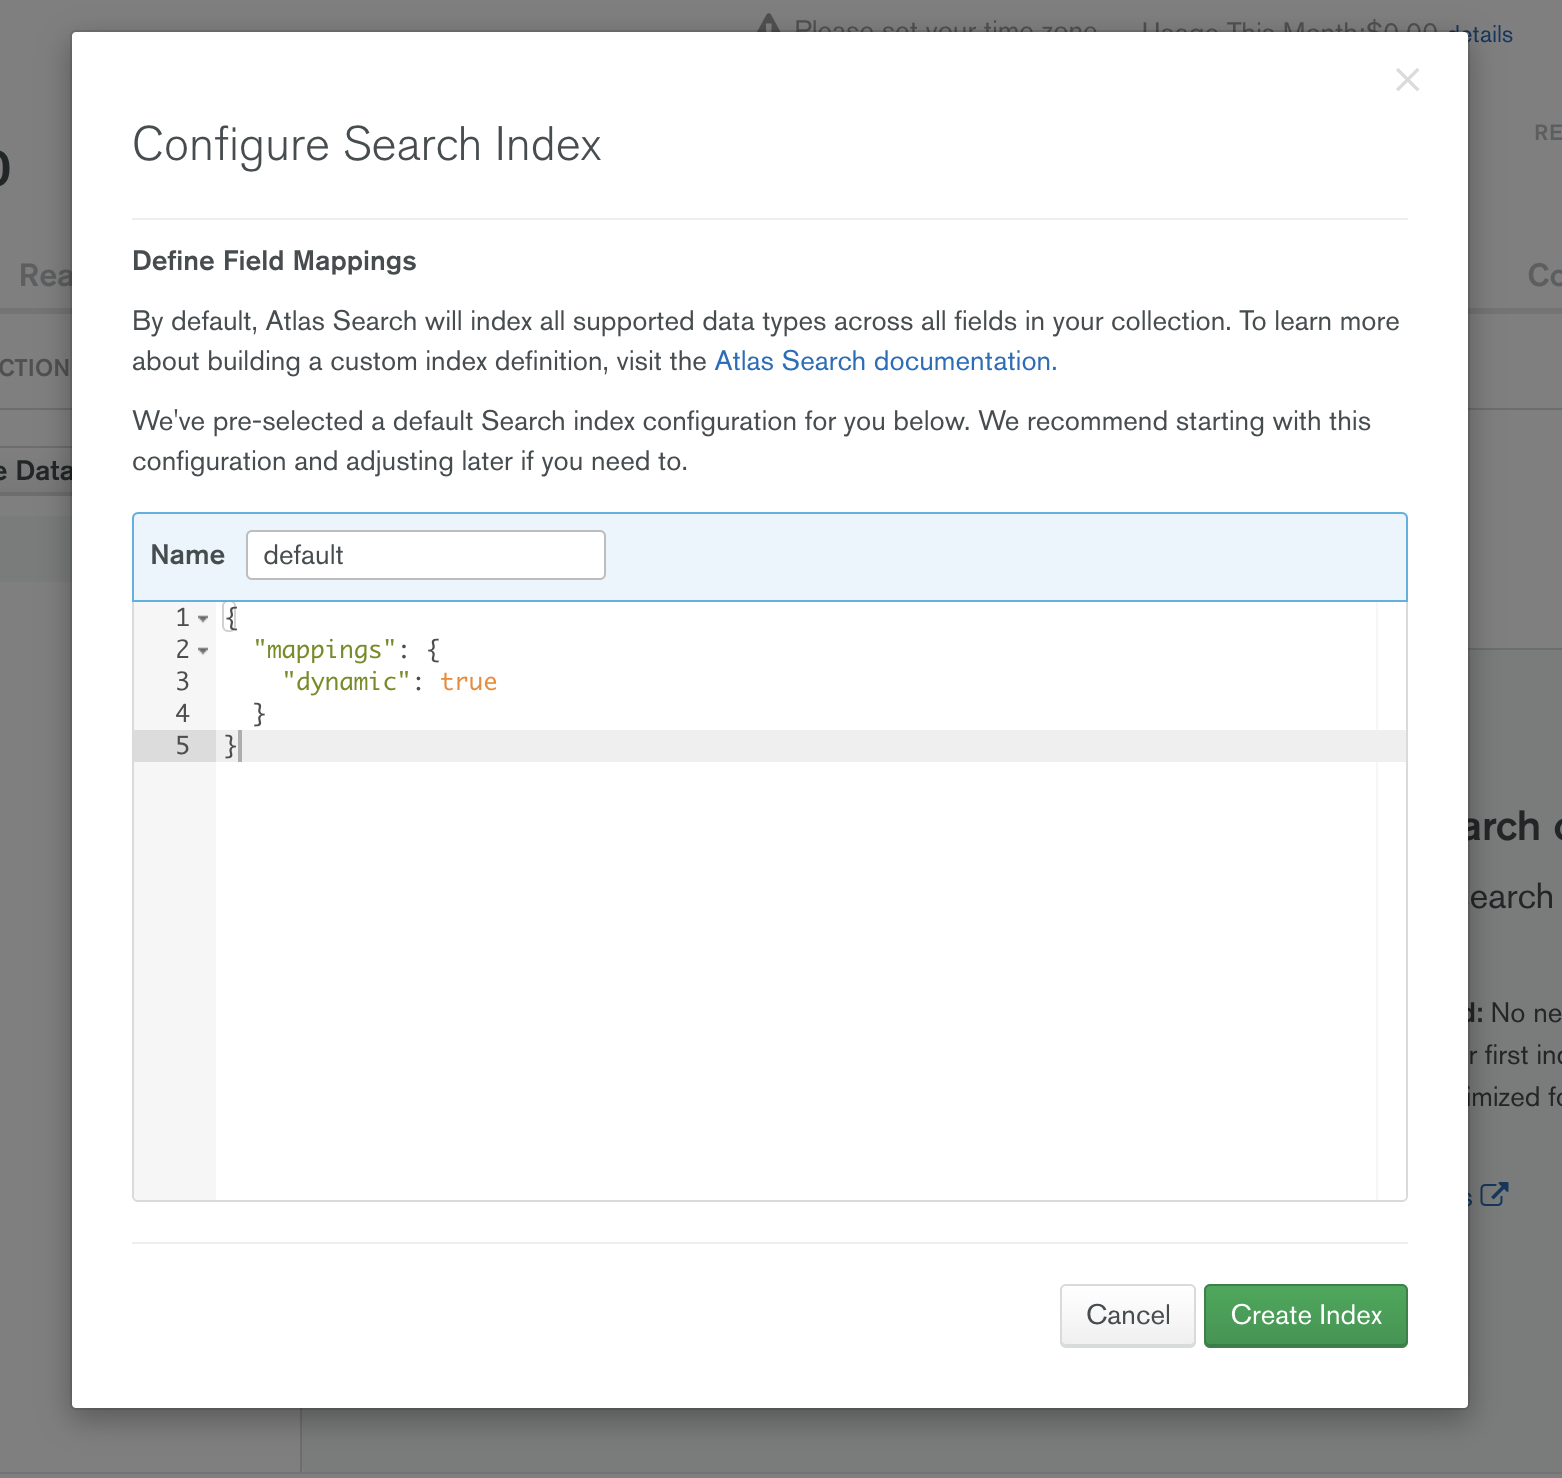
By default, we dynamically map all the text fields in your collection. This suits MongoDB's flexible data model perfectly. As you add new data to your collection and your schema evolves, dynamic mapping accommodates those changes in your schema and adds that new data to the Full-Text Search index automatically.
Let's accept the default settings and click Create Index. And that's all you need to do to start taking advantage of Lucene in your MongoDB Atlas data!
- ✅ Spin up an Atlas cluster and load sample movie data
- ✅ Create a Full-Text Search index in movie data collection
- ⬜ Write an aggregation pipeline with $searchBeta operator
- ⬜ Create a RESTful API to access data
- ⬜ Call from the front end
Full-Text Search queries take the form of an aggregation pipeline stage. The $searchBeta stage performs a search query on the specified field(s) covered by the Full-Text Search index and must be used as the first stage in the aggregation pipeline.
Let's use MongoDB Compass to see an aggregation pipeline that makes use of this Full-Text Search index. For instructions on how to connect your Atlas cluster to MongoDB Compass, click here.
You do not have to use Compass for this stage, but I really love the easy-to-use UI Compass has to offer. Plus the ability to preview the results by stage makes troubleshooting a snap! For more on Compass' Aggregation Pipeline Builder, check out this blog.
Navigate to the Aggregations tab in the
sample_mflix.movies collection:
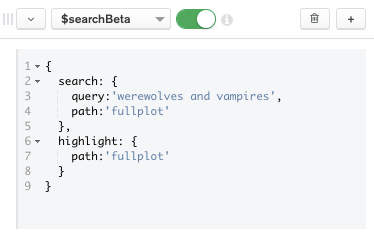
For the first stage, select the $searchBeta aggregation operator to search for the terms 'werewolves and vampires' in the
fullplot field.Using the highlight option will return the highlights by adding fields to the result that display search terms in their original context, along with the adjacent text content. (More on this later.)

Note the returned movie documents in the preview panel on the right. If no documents are in the panel, double-check the formatting in your aggregation code.

We use
$project to get back only the fields we will use in our movie search application. We also use the $meta operator to surface each document's searchScore and searchHighlights in the result set.Let's break down the individual pieces in this stage further:
SCORE: The
"$meta": "searchScore" contains the assigned score for the document based on relevance. This signifies how well this movie's fullplot field matches the query terms 'werewolves and vampires' above.Note that by scrolling in the right preview panel, the movie documents are returned with the score in descending order so that the best matches are provided first.
HIGHLIGHT: The "$meta": "searchHighlights" contains the highlighted results.
Because searchHighlights and searchScore are not part of the original document, it is necessary to use a $project pipeline stage to add them to the query output.
Now open a document's highlight array to show the data objects with text values and types.
1 title:"The Mortal Instruments: City of Bones" 2 fullplot:"Set in contemporary New York City, a seemingly ordinary teenager, Clar..." 3 year:2013 4 score:6.849891185760498 5 highlight:Array 6 0:Object 7 path:"fullplot" 8 texts:Array 9 0:Object 10 value:"After the disappearance of her mother, Clary must join forces with a g..." 11 type:"text" 12 1:Object 13 value:"vampires" 14 type:"hit" 15 2:Object 16 3:Object 17 4:Object 18 5:Object 19 6:Object 20 score:3.556248188018799
highlight.texts.value - text from the
fullplot field, which returned a match. highlight.texts.type - either a hit or a text. A hit is a match for the query, whereas a text is text content adjacent to the matching string. We will use these later in our application code.
Remember the results are returned with the scores in descending order, so $limit: 10 will bring the 10 most relevant movie documents to your search query.
Finally, if you see results in the right preview panel, your aggregation pipeline is working properly! Let's grab that aggregation code with Compass' Export Pipeline to Language feature by clicking the button in the top toolbar.
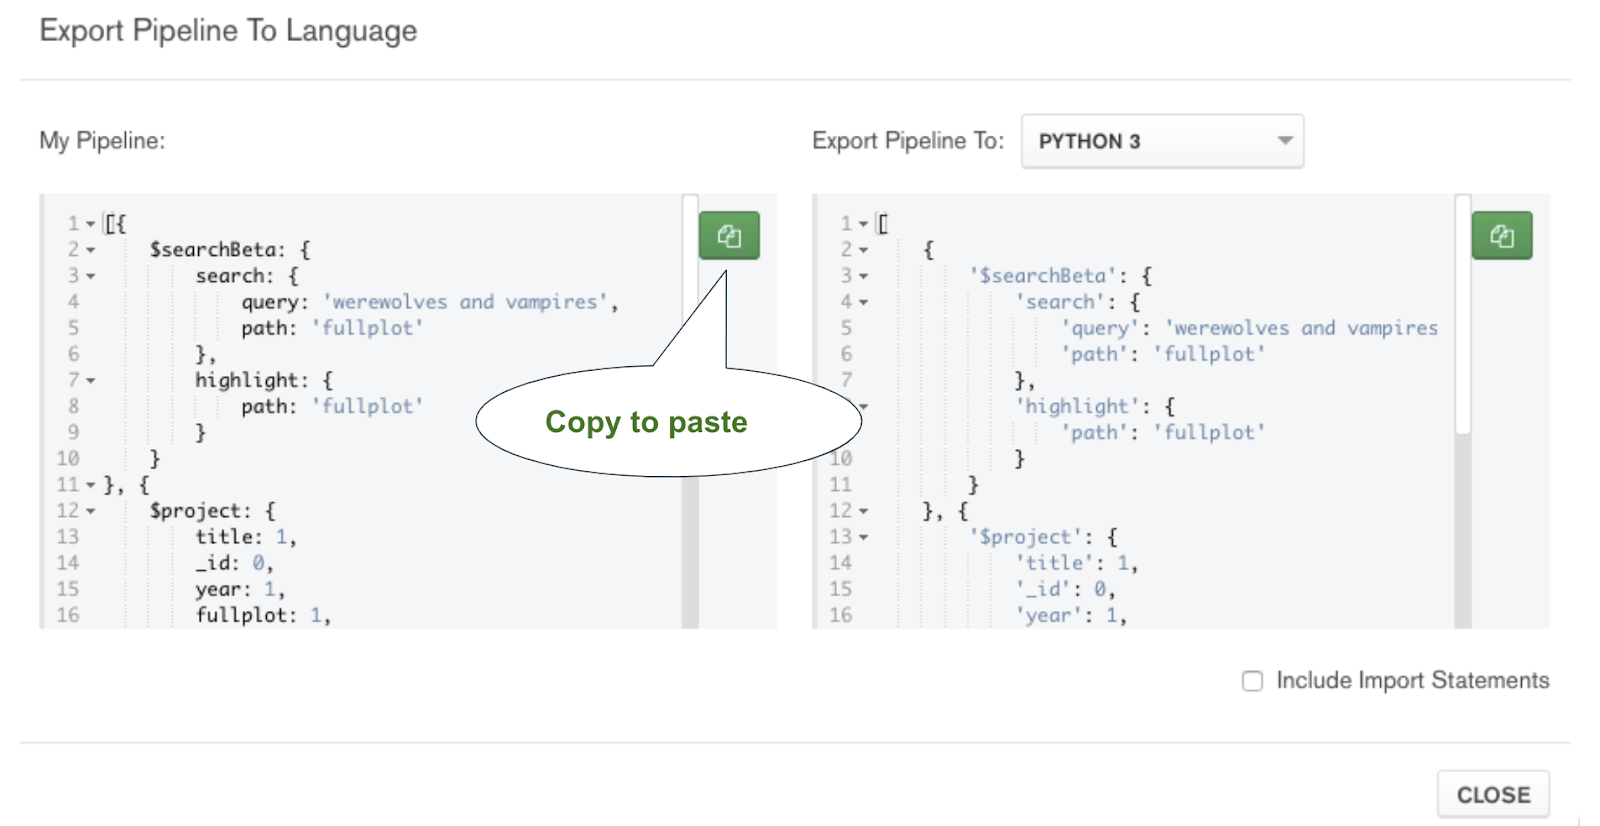
Your final aggregation code will be this:
1 [ 2 { $searchBeta: { 3 search: { 4 query: 'werewolves and vampires', 5 path: 'fullplot' }, 6 highlight: { path: 'fullplot' } 7 }}, 8 { $project: { 9 title: 1, 10 _id: 0, 11 year: 1, 12 fullplot: 1, 13 score: { $meta: 'searchScore' }, 14 highlight: { $meta: 'searchHighlights' } 15 }}, 16 { $limit: 10 } 17 ]
- ✅ Spin up an Atlas cluster and load sample movie data
- ✅ Create a Full-Text Search index in movie data collection
- ✅ Write an aggregation pipeline with $searchBeta operator
- ⬜ Create a RESTful API to access data
- ⬜ Call from the front end
Now that we have the heart of our movie search engine in the form of an aggregation pipeline, how will we use it in an application? There are lots of ways to do this, but I found the easiest was to simply create a RESTful API to expose this data - and for that, I used MongoDB Stitch's HTTP Service.
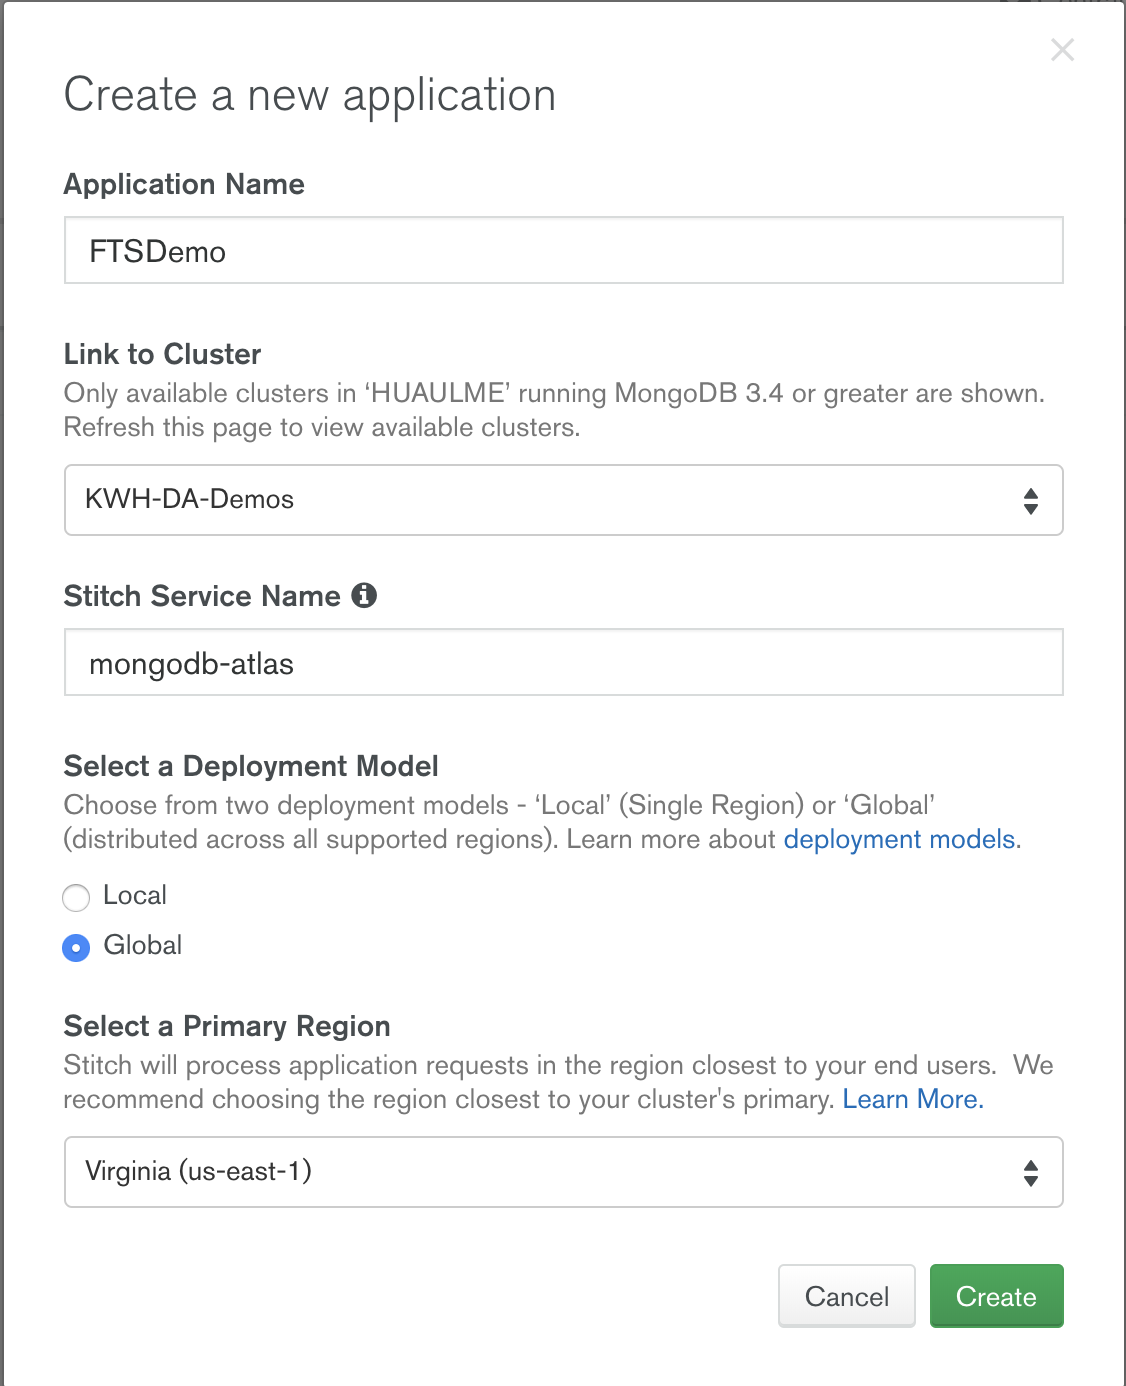
Stitch is MongoDB's serverless platform where functions written in Javascript automatically scale to meet current demand. To create a Stitch application, return to your Atlas UI and click Stitch under SERVICES on the left menu, then click the green Create New Application button.
Name your Stitch application FTSDemo and make sure to link to your M0 cluster. All other default settings are fine:
Now click the 3rd Party Services menu on the left and then Add a Service. Select the HTTP service and name it movies:
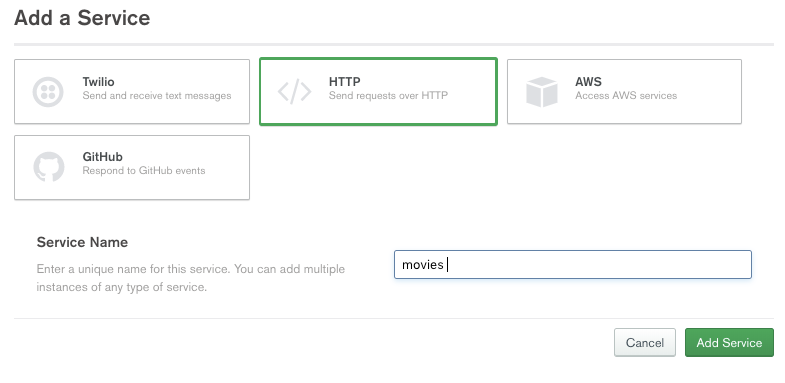
Click the green Add a Service button, and you'll be directed to add an incoming webhook.
Once in the Settings tab, enable Respond with Result, set the HTTP Method to GET, and to make things simple, let's just run the webhook as the System and skip validation.
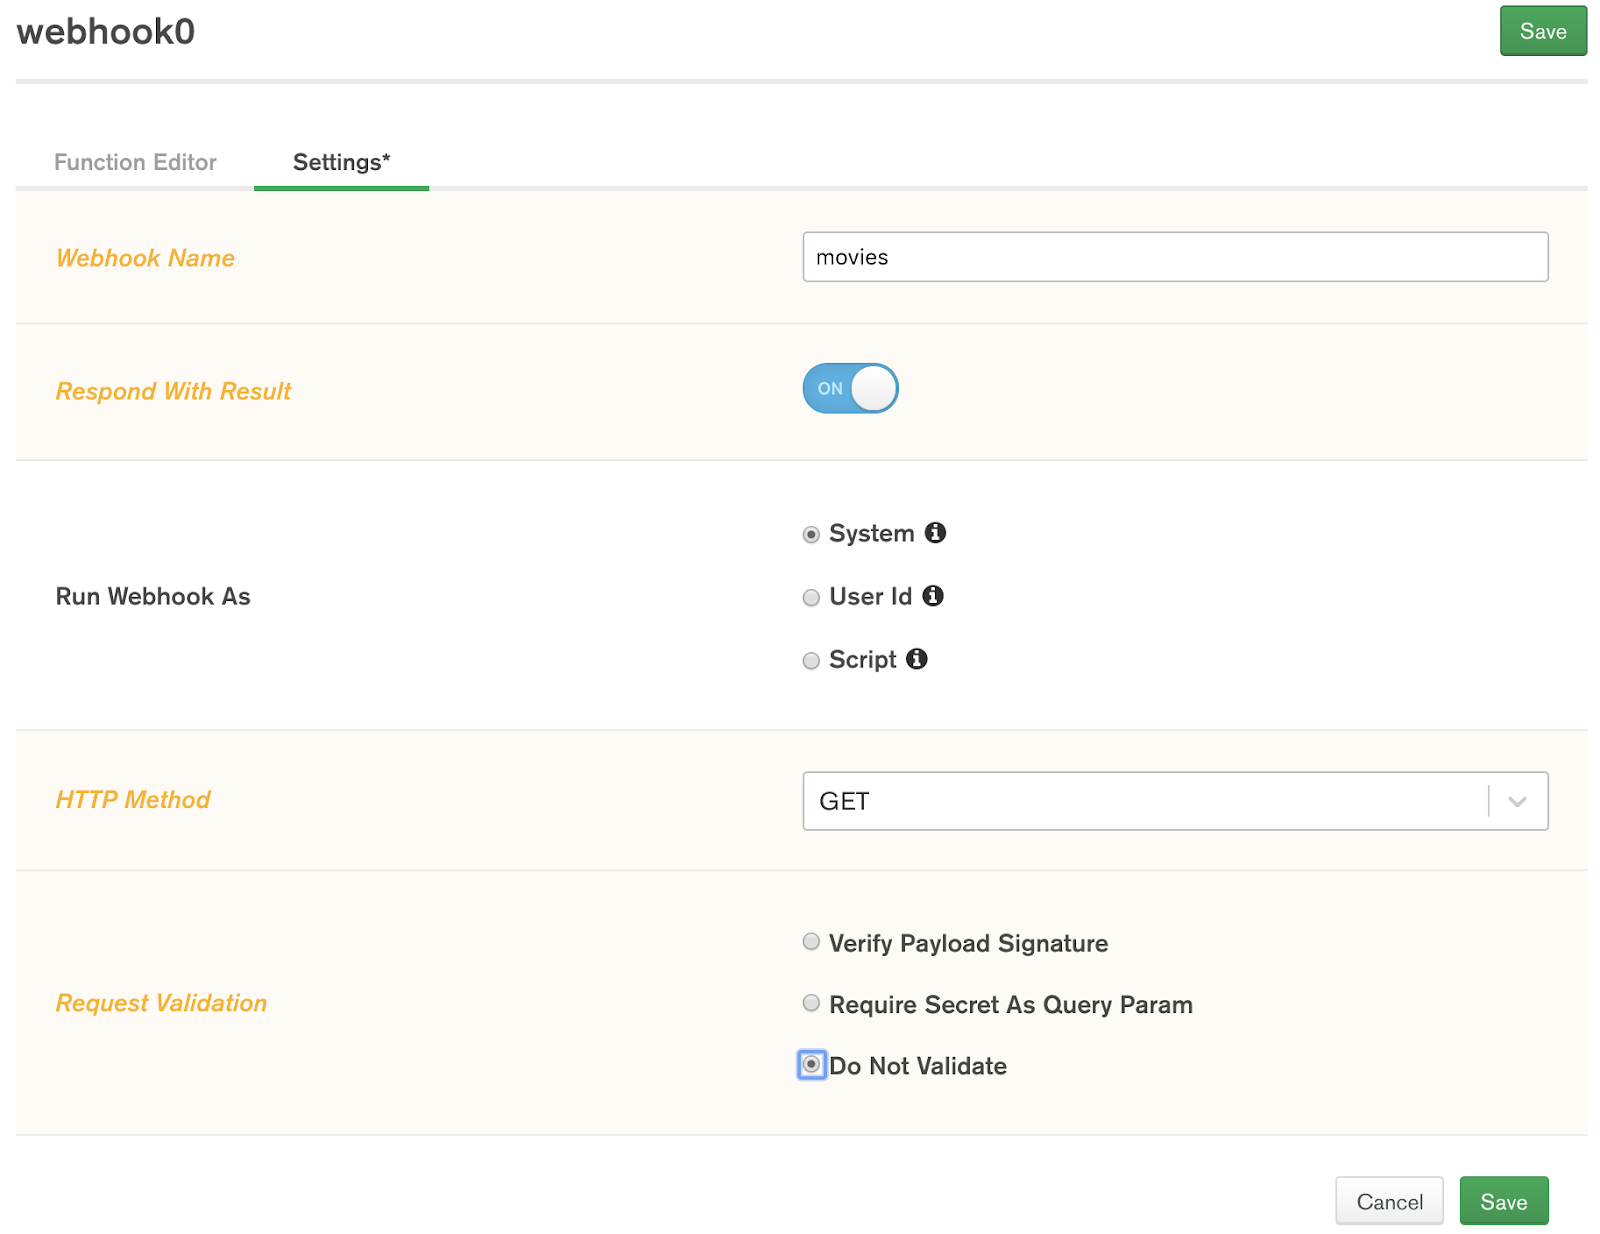
In this service function editor, replace the example code with the following:
1 exports = function(payload) { 2 const collection = context.services.get("mongodb-atlas").db("sample_mflix").collection("movies"); 3 let arg = payload.query.arg; 4 return collection.aggregate([ 5 { $searchBeta: { 6 search: { 7 query: arg, 8 path:'fullplot', 9 }, 10 highlight: { path: 'fullplot' } 11 }}, 12 { $project: { 13 title: 1, 14 _id:0, 15 year:1, 16 fullplot:1, 17 score: { $meta: 'searchScore'}, 18 highlight: {$meta: 'searchHighlights'} 19 }}, 20 { $limit: 10} 21 ]).toArray(); 22 };
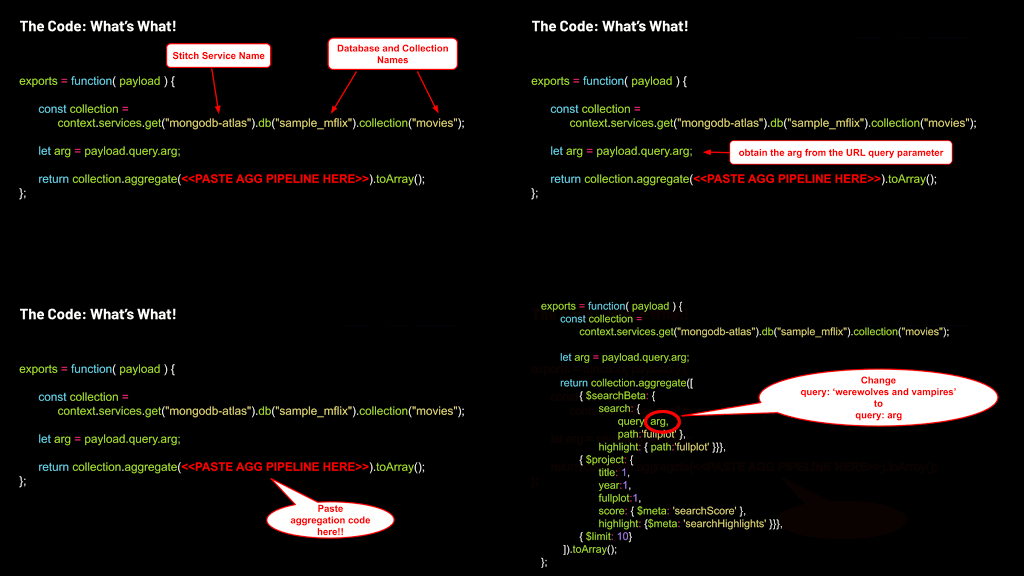
Let's break down some of these components. MongoDB Stitch interacts with your Atlas movies collection through the global context variable. In the service function, we use that context variable to access the sample_mflix.movies collection in your Atlas cluster:
1 const collection = 2 context.services.get("mongodb-atlas").db("sample_mflix").collection("movies");
We capture the query argument from the payload:
1 let arg = payload.query.arg;
Return the aggregation code executed on the collection by pasting your aggregation into the code below:
1 return collection.aggregate(<<PASTE AGGREGATION PIPELINE HERE>>).toArray();
Finally, after pasting the aggregation code, we changed the terms 'werewolves and vampires' to the generic arg to match the function's payload query argument - otherwise our movie search engine capabilities will be extremely limited.
Now you can test in the Console below the editor by changing the argument from arg1: "hello" to arg: "werewolves and vampires".
Note: Please be sure to change BOTH the field name arg1 to arg, as well as the string value "hello" to "werewolves and vampires" - or it won't work.

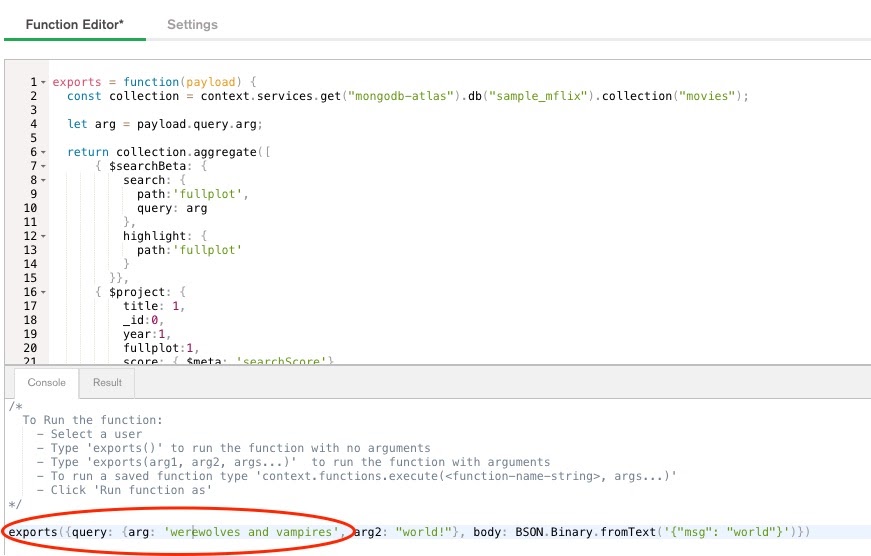
Click Run to verify the result:

If this is working, congrats! We are almost done! Make sure to SAVE and deploy the service by clicking REVIEW & DEPLOY CHANGES at the top of the screen.
The beauty of a REST API is that it can be called from just about anywhere. Let's execute it in our browser. However, if you have tools like Postman installed, feel free to try that as well.
Switch to the Settings tab of the movies service in Stitch and you'll notice a Webhook URL has been generated.

Click the COPY button and paste the URL into your browser. Then append the following to the end of your URL: ?arg='werewolves and vampires'
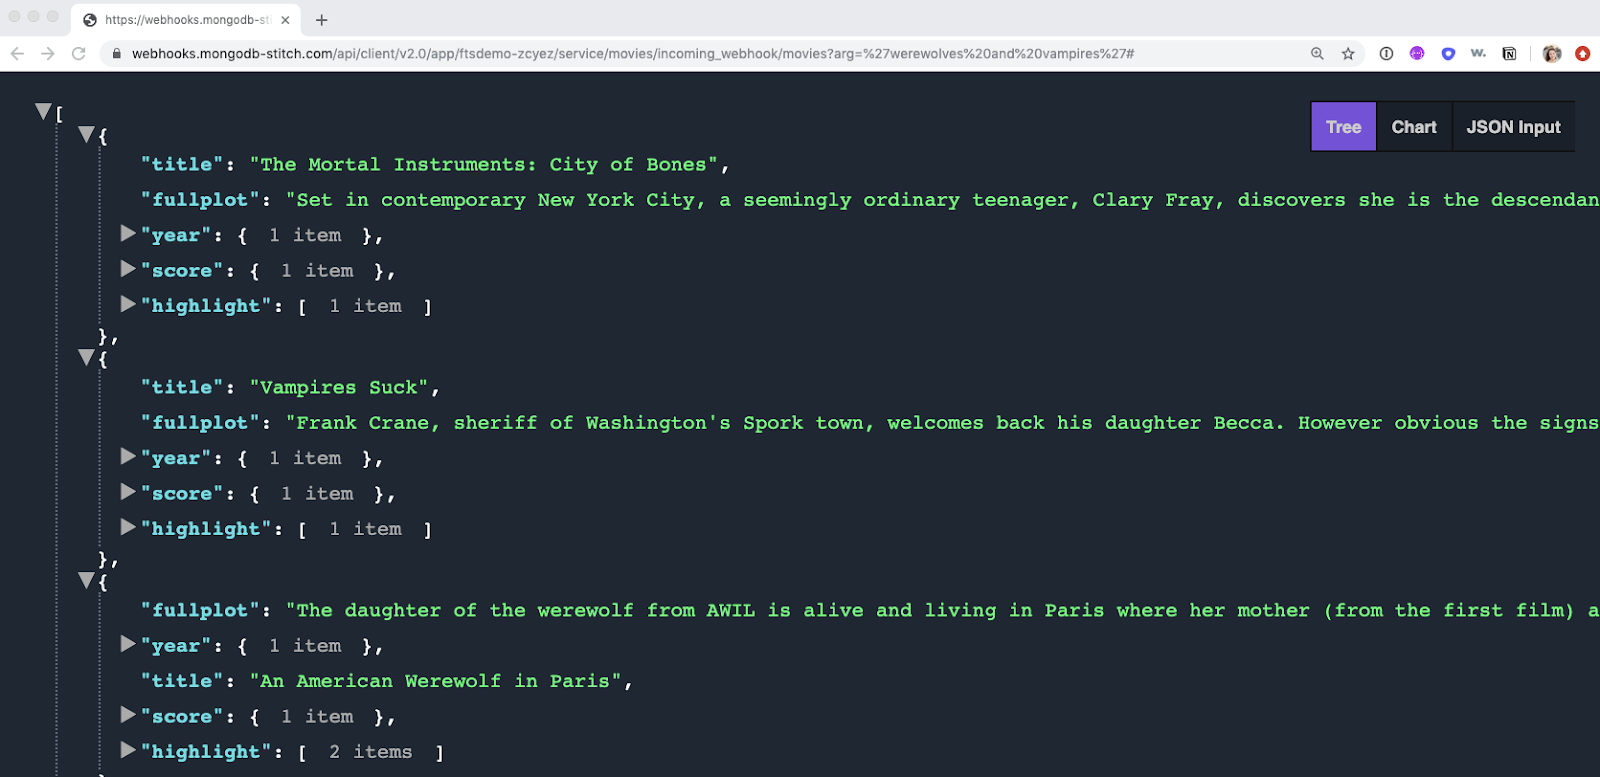
If you receive an output like what we have above, congratulations! You have successfully created a movie search API!

- ✅ Spin up an Atlas cluster and load sample movie data
- ✅ Create a Full-Text Search index in movie data collection
- ✅ Write an aggregation pipeline with $searchBeta operator
- ✅ Create a RESTful API to access data
- ⬜ Call from the front end

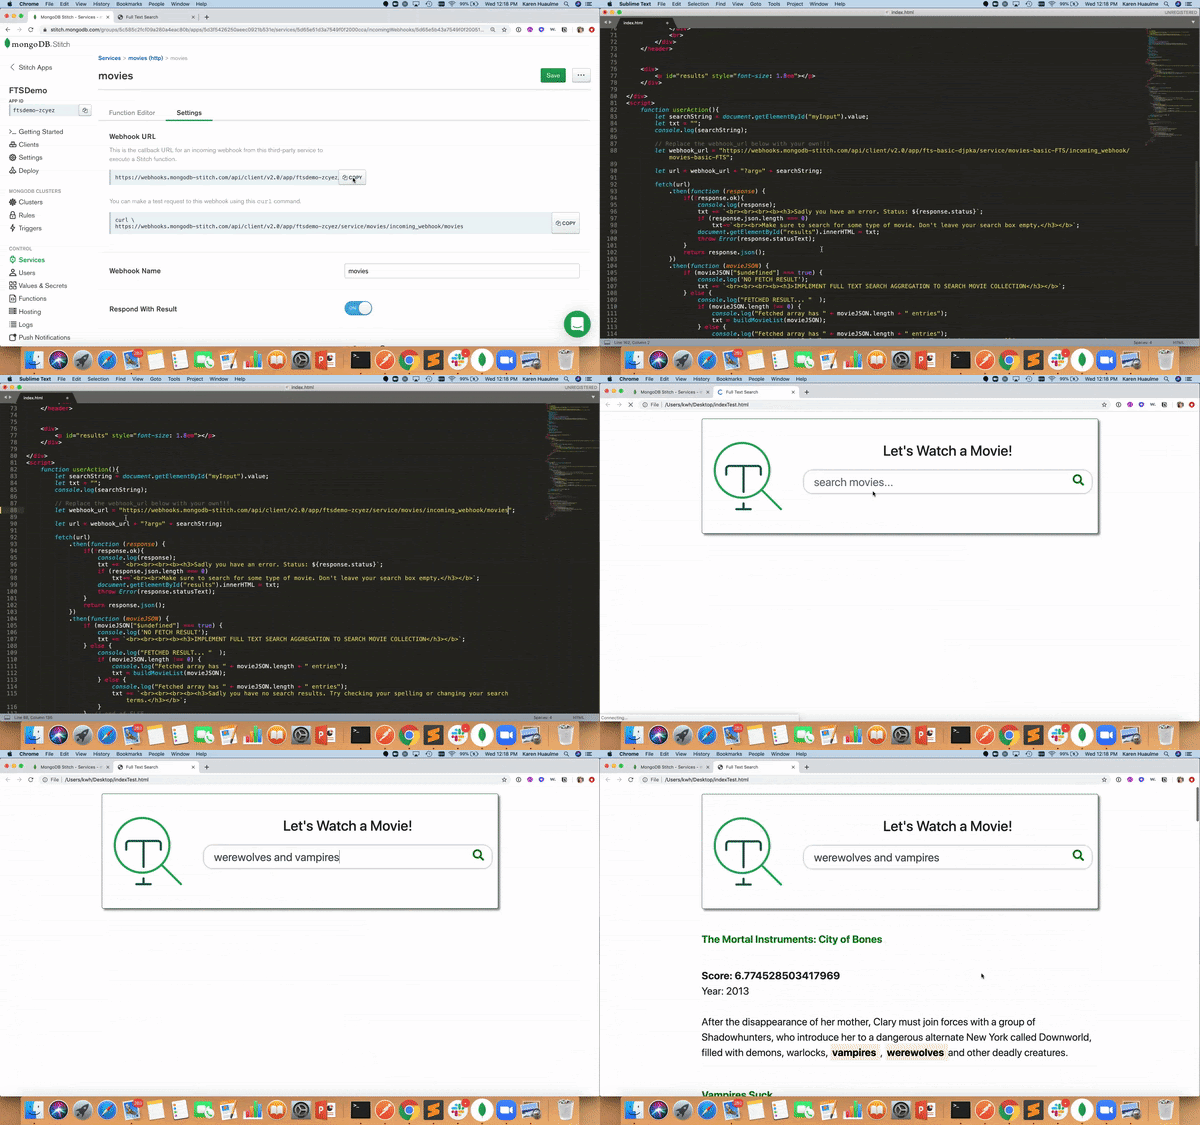
From the front end application, it takes a single call from the Fetch API to retrieve this data. Download the following index.html file and open it in your browser. You will see a simple search bar:

Entering data in the search bar will bring you movie search results because the application is currently pointing to an existing API.
Now open the HTML file with your favorite text editor and familiarize yourself with the contents. You'll note this contains a very simple container and two javascript functions:
- Line 82 - userAction() will execute when the user enters a search. If there is valid input in the search box and no errors, we will call the buildMovieList() function.
- Line 125 - buildMovieList() is a helper function for userAction() which will build out the list of movies, along with their scores and highlights from the 'fullplot' field. Notice in line 146 that if the highlight.texts.type === "hit" we highlight the highlight.texts.value with the tag.
In the userAction() function, we take the input from the search form field in line 79 and set it equal to searchString. Notice on line 82 that the webhook_url is already set to a RESTful API I created in my own FTSDemo application. In this application, we append that searchString input to the webhook_url before calling it in the fetch API in line 111. To make this application fully your own, simply replace the existing webhook_url value on line 82 with your own API from the movies Stitch HTTP Service you just created. 🤞
Now save these changes, and open the index.html file once more in your browser, et voilà! You have just built your movie search engine using Full-Text search indexes. 🙌 What kind of movie do you want to watch?!
Now that you have just seen how easy it is to build a simple, powerful search into an application with MongoDB Atlas Full-Text Search, go ahead and experiment with other more advanced features, such as type-ahead or fuzzy matching, for your fine-grained searches. Check out our $searchBeta documentation for other possibilities.

Harnessing the power of Apache Lucene for efficient search algorithms, static and dynamic field mapping for flexible, scalable indexing, all while using the same MongoDB Query Language (MQL) you already know and love, spoken in our very best Liam Neeson impression MongoDB now has a very particular set of skills. Skills we have acquired over a very long career. Skills that make MongoDB a DREAM for developers like you.