Build a CRUD API With MongoDB, Typescript, Express, Prisma, and Zod
Onyedikachi Kindness Eni10 min read • Published Sep 04, 2024 • Updated Sep 04, 2024
FULL APPLICATION
Rate this tutorial
Traditional technologies often struggle to keep pace with the demands for scalability, maintainability, and rapid development cycles. These systems are plagued by monolithic architectures, difficult-to-maintain codebases, and a lack of modern tooling, leading to inefficiencies and increased development costs.
Enter the modern stack: TypeScript, Express, Prisma, MongoDB, and Zod. This powerful combination offers a robust, type-safe, and scalable solution for building web applications. TypeScript enhances JavaScript with static typing, reducing runtime errors and improving developer productivity. Express, a minimalist web framework, simplifies the creation of APIs with its lightweight yet powerful routing and middleware capabilities. Prisma, a next-generation ORM, provides a type-safe interface to interact with databases, bridging the gap between application logic and database operations. MongoDB Atlas, a leading NoSQL database and data platform, excels in handling large volumes of unstructured data and horizontal scaling. Finally, Zod ensures data integrity with its TypeScript-first schema declaration and validation.
Using this modern stack, we will build a basic user management API that will perform the following CRUD operations:
- Create user accounts
- Read user profiles
- Update user information
- Delete user accounts
Express will be used to build the web server, Prisma the ORM, MongoDB as the database, and Zod to validate payloads.
- Working knowledge of Typescript
- Familiarity with Express
- MongoDB Atlas cluster
- Code editor — such as VS Code
- Node.js latest LTS installed on your computer
Create a project directory called
CRUD-API and navigate to it.1 mkdir CRUD-API 2 cd CRUD-API
Next, initialize a new project and install Typescript and Prisma:
1 npm init -y 2 npm install prisma typescript ts-node @types/node --save-dev
The preceding command creates a
package.json file with a Typescript setup:Next, initialize TypeScript:
1 npx tsc --init
1 npx prisma
Run the following command to set up your Prisma ORM project:
1 npx prisma init
The preceding commanding does the following:
- Creates a new prisma directory with a schema.prisma file
- Creates a .env file, where the environment variable used for the database connection will be defined
Run the following command to install the @prisma/client package, which will allow us to use Prisma Client.
1 npm install @prisma/client express zod
In the preceding command, we installed the
@prisma/client package, express, and zod. The @prisma/client package will allow us to use Prisma Client for database access.Finally, run the following command:
1 npm install @types/express nodemon --save-dev
After installing the dependencies, your
package.json file should look like this:1 { 2 "name": "crud-api", 3 "version": "1.0.0", 4 "description": "", 5 "main": "index.js", 6 "scripts": { 7 "test": "echo \"Error: no test specified\" && exit 1" 8 }, 9 "keywords": [], 10 "author": "", 11 "license": "ISC", 12 "devDependencies": { 13 "@types/express": "^4.17.21", 14 "@types/node": "^20.12.10", 15 "nodemon": "^3.1.0", 16 "prisma": "^5.13.0", 17 "ts-node": "^10.9.2", 18 "typescript": "^5.4.5" 19 }, 20 "dependencies": { 21 "@prisma/client": "^5.13.0", 22 "express": "^4.19.2", 23 "zod": "^3.23.7" 24 } 25 }
The tree structure of the project should look like this:
1 ├── CRUD-API 2 │ ├── node_modules 3 │ ├── Prisma 4 │ │ └── Schema.prisma 5 │ ├── src 6 │ ├── .gitignore 7 │ ├── package.json 8 │ ├── package-lock.json 9 │ └── tsconfig.json
In the root directory of the project, create a
src sub-directory. The src directory will include the source code of the API.Next, in the src directory, create an
app.ts file and enter the following code:1 import Express from 'express'; 2 3 // Initiate express 4 const app = Express(); 5 6 app.use(Express.json()); 7 8 // Setup “hello world” endpoint 9 10 const port = process.env.PORT || 3000; 11 12 app.get('*', (req, res) => res.send('Hello World!')); 13 14 // Start the express server on the relevant port 15 app.listen(port, () => { 16 console.log(`server is running on ${port}`); 17 });
To launch our server, we have to add a new script to our package.json file. Add the following line to the scripts property of the package.json file:
1 "dev": "nodemon --watch ./src --ext ts --exec 'ts-node ./src/app.ts'"
In the preceding code, we are using the nodemon command. nodemon is an excellent tool for Node.js applications. It can restart your server when the source changes.
Enter the command below to start the server:
1 npm run dev
Now, when you go to your browser and enter 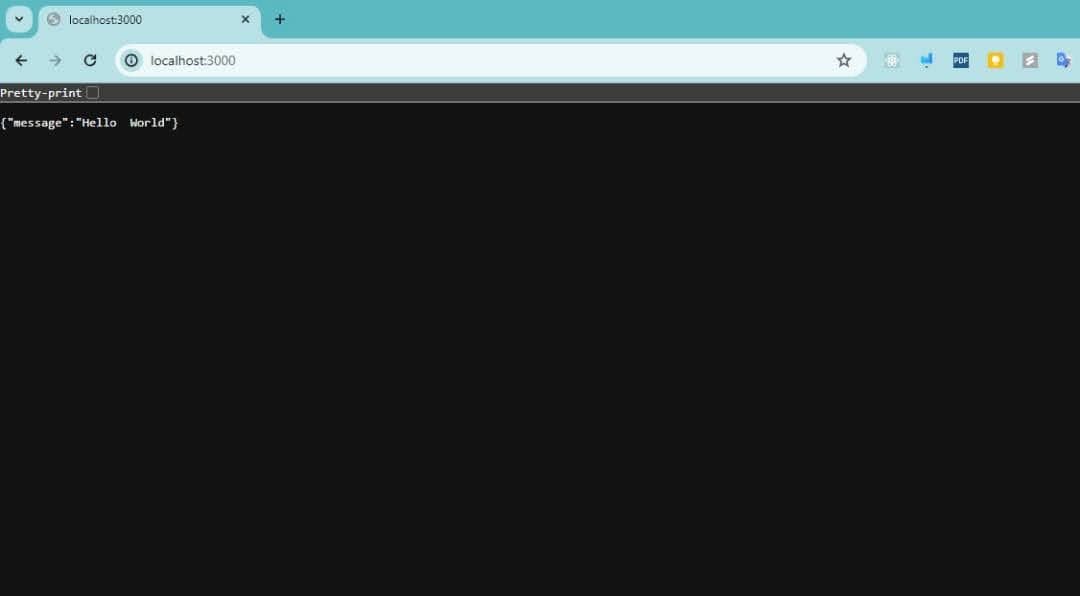
http://localhost:3000, you will see the text Hello World! from our Express callback function.
To store our data, we will use MongoDB Atlas. A database connection URL is required to connect the database via Prisma. Follow the guide to set up a MongoDB Atlas cluster and get a connection URL.
Next, in the
.env file, add the connection URL as an environment variable:1 DATABASE_URL="mongodb+srv://<username>:<password>@<cluster-name>.xxxxx.mongodb.net/"
In the
prisma.schema file, enter the following code:1 generator client { 2 provider = "prisma-client-js" 3 } 4 5 datasource db { 6 provider = "mongodb" 7 url = env("DATABASE_URL") 8 }
The preceding code provides the required data for Prisma to connect to our database. In the datasource block, the value passed to the provider represents the type of database being used (MongoDB, in this case), while the value of url is the database connection URL.
The user model will define the user details to be stored in the database, with the following attributes:
- name: String, required field to store user’s name
- email: String, required field to store user’s email
- phoneNumber: String, required field to store user’s phone number
- gender: String, required field to store user gender
To enable and handle user CRUD operations on the database, we will implement the following API endpoints.
1 Operation API route HTTP method 2 Create User /api/users POST 3 Get Users /api/users GET 4 Fetch a User /api/users:userId GET 5 Update a User/api/users:userId PATCH 6 Delete a User/api/users:userId DELETE
Now, let’s create the API schema.
In the
prisma/schema.prisma file, add the following code:1 model User { 2 id String @id @default(auto()) @map("_id") @db.ObjectId 3 name String 4 email String 5 phoneNumber String 6 gender String 7 }
In a traditional relational database, a model will create a table, but since we are using MongoDB, our model creates a collection. Notice the id field is mapped with
@map("_id") decorator because _id is the default provided by MongoDB.Now, let’s generate the Prisma Client by running the following command:
1 npx prisma generate
The Prisma Client gives us type-safe access to our database.
Next, we will implement our route controllers which will utilize Prisma Client to perform database operations.
Fundamentally, routers and controllers enable the structured handling of requests and responses in an application. The routers map incoming HTTP requests to specific endpoints, while the controllers receive the requests from routers, process any business logic, interact with the database, and return the appropriate responses to the client.
Now, let’s create the routes and controllers.
In the
src directory, create a client.ts file and enter the following code:1 import { PrismaClient } from '@prisma/client'; 2 3 const prisma = new PrismaClient(); 4 5 export default prisma;
In the preceding code, we created a Prisma Client instance, which will be used for database interaction.
Next, in the
src directory, create the routes and controllers sub-directories.1 📦 CRUD-API 2 ┣ 📂 src 3 ┃ ┣ 📂 routes 4 ┃ ┣ 📂 controllers 5 ┃ ┣ 📄 app.ts 6 ┃ ┣ 📄 client.ts
By default, a controller handles incoming requests, processes them, and provides an appropriate response. Let’s implement the controllers for our API.
In the controllers subdirectory, create a
user.route.ts file.The createUser handles POST requests for creating new users.
Enter the following code in the
user.route.ts file.1 import { Request, Response } from "express"; 2 import prisma from "../client"; 3 4 // Creating a user 5 export async function createUser(req: Request, res: Response) { 6 try { 7 const user = await prisma.user.create({ 8 data: req.body, 9 }); 10 11 res.status(201).json({ 12 status: true, 13 message: "User Successfully Created", 14 data: user, 15 }); 16 } catch (error) { 17 res.status(500).json({ 18 status: false, 19 message: 'server error' 20 }); 21 } 22 }
The getUser controller handles GET requests for all users.
Enter the following in the
user.route.ts file.1 // Get all Users 2 export async function getUsers(req: Request, res: Response) { 3 const users = await prisma.user.findMany(); 4 5 res.json({ 6 status: true, 7 message: "Users Successfully fetched", 8 data: users, 9 }); 10 } 11 12 In the preceding code, the getUsers controller gets all users. 13 14 ### getUser controller 15 The getUser controller handles GET requests for a single user. 16 17 Enter the following in the `user.route.ts` file. 18 // Get a single user 19 export async function getUser(req: Request, res: Response) { 20 const { userid } = req.params; 21 const user = await prisma.user.findFirst({ 22 where: { 23 id: userid, 24 }, 25 }); 26 27 res.json({ 28 status: true, 29 message: "User Successfully fetched", 30 data: user, 31 }); 32 }
In the preceding code, the getUser controller gets a single user.
Enter the following in the
user.route.ts file.1 // deleting a user 2 export async function deleteUser(req: Request, res: Response) { 3 const { userid } = req.params; 4 5 try { 6 const user = await prisma.user.findFirst({ 7 where: { 8 id: userid, 9 }, 10 }); 11 12 if (!user) { 13 return res.status(401).json({ 14 status: false, 15 message: 'User not found', 16 }); 17 } 18 await prisma.user.delete({ 19 where: { 20 id: userid, 21 }, 22 }), 23 res.json({ 24 status: true, 25 message: 'User Successfully deleted', 26 }); 27 } catch { 28 res.status(501).json({ 29 status: false, 30 message: 'server error', 31 }); 32 } 33 }
In the preceding code, the deleteUser controller deletes a user.
Enter the following in the
user.route.ts file.1 // updating a single user 2 export async function updateUser(req: Request, res: Response) { 3 try { 4 const { userid } = req.params; 5 6 const user = await prisma.user.findFirst({ 7 where: { 8 id: userid, 9 }, 10 }); 11 12 if (!user) { 13 return res.status(401).json({ 14 status: false, 15 message: 'User not found', 16 }); 17 } 18 19 const updatedUser = await prisma.user.update({ 20 where: { 21 id: userid, 22 }, 23 data: req.body, 24 }); 25 26 res.json({ 27 status: true, 28 message: 'User Successfully updated', 29 data: updatedUser, 30 }); 31 } catch (error) { 32 console.log(error); 33 res.status(500).json({ 34 status: false, 35 message: 'server error', 36 }); 37 } 38 }
In the preceding code, the updateUser controller updates a user.
Next, let’s create the routes that will utilize the controllers.
In the routes subdirectory, create an
index.ts and user.routes.ts file.In
index.ts, enter the following code:1 import { Router } from 'express'; 2 import userRoute from './user.route'; 3 4 // Index 5 const indexRoute = Router(); 6 7 indexRoute.get('', async (req, res) => { 8 res.json({ message: 'Welcome User' }); 9 }); 10 11 indexRoute.use('/users', userRoute); 12 13 export default indexRoute; 14 15 Next, in user.routes.ts enter the following code: 16 import { Router } from 'express'; 17 import { 18 createUser, 19 deleteUser, 20 getUser, 21 getUsers, 22 updateUser, 23 } from '../controllers/user.controller'; 24 25 // Users layout Route 26 const userRoute = Router(); 27 28 userRoute.post('', createUser); 29 userRoute.get('', getUsers); 30 userRoute.get('/:userid', getUser); 31 userRoute.delete('/:userid', deleteUser); 32 userRoute.patch('/:userid', updateUser); 33 34 export default userRoute;
The GET route can be seen in the browser, but to check the other routes, we will use the POSTMAN tool.
Let’s create a new user via the POST method. In the address bar in Postman, enter the request URL 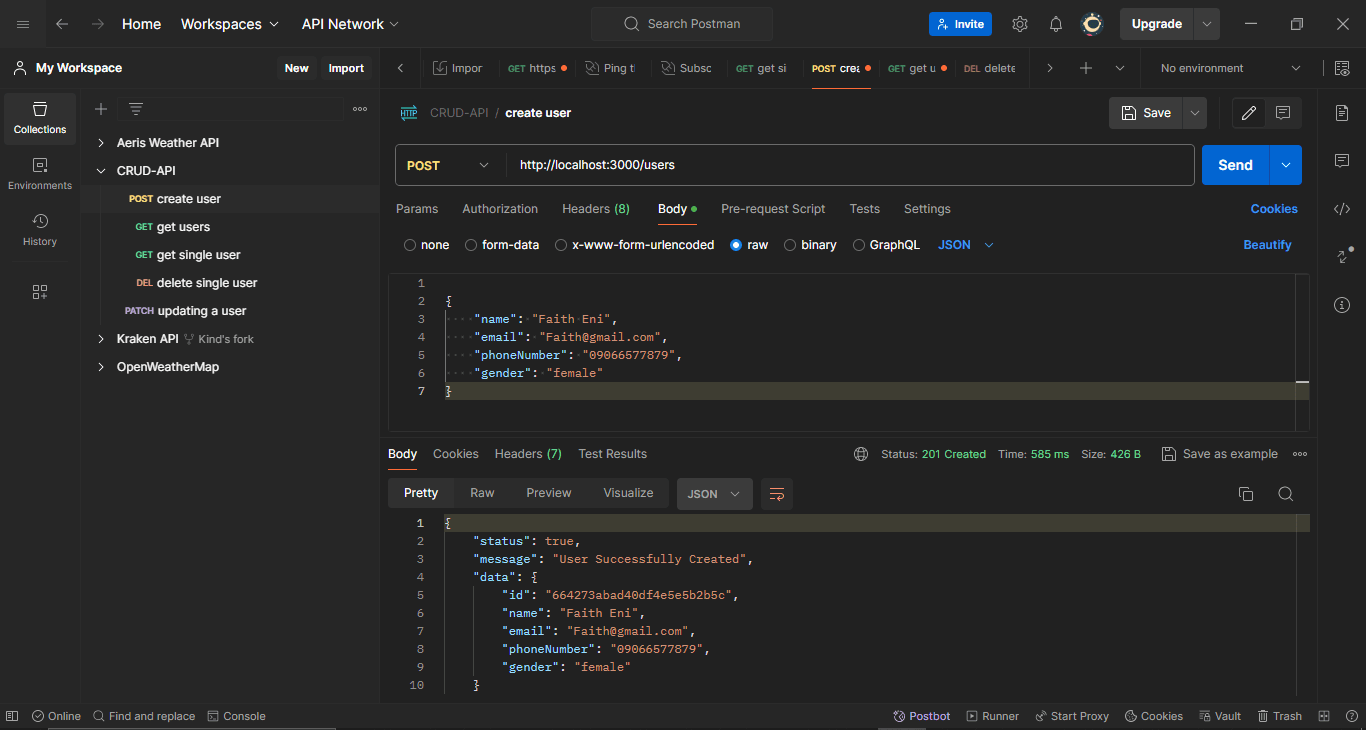 POST Request: Create a User
http://localhost:3000/users, enter the payload, and hit the send button. We will receive back the correct JSON and also the status of 201 — confirming a resource has been created.
The GET method is used to fetch all users. It requires no payload.
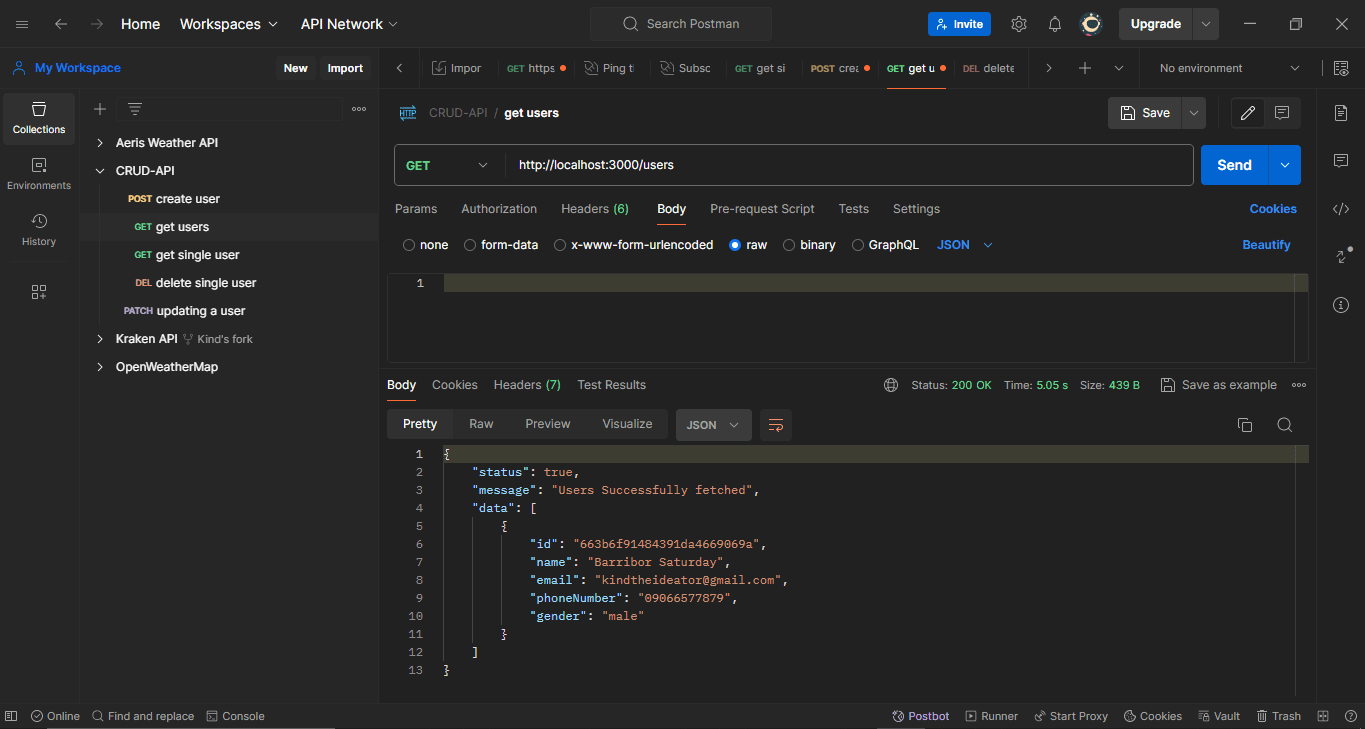
GET Request: Get all UsersHowever, to fetch a single user, we have to provide the user id. The endpoint will be
http://localhost:3000/users/id.GET Request: Get a single userFor the DELETE method, the id of the user being deleted will be provided. Again, we are using the endpoint 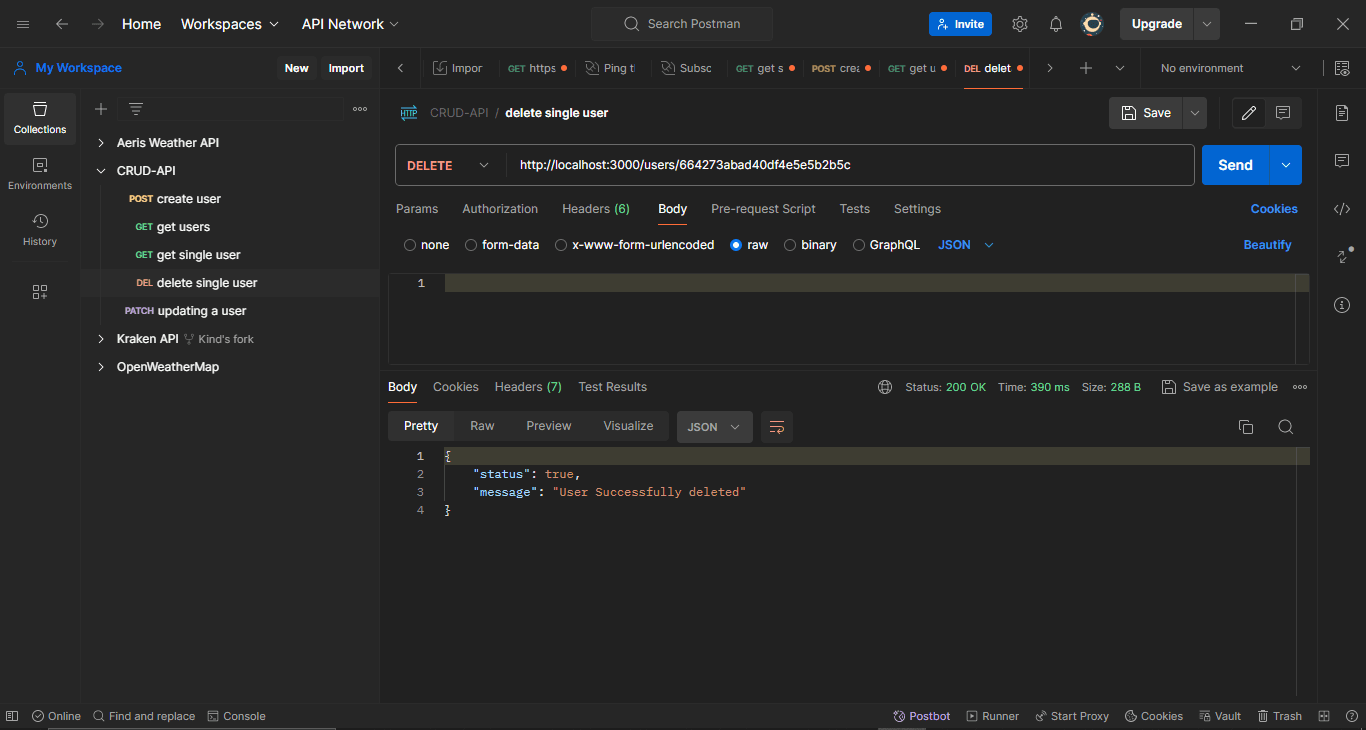
http://localhost:3000/users/id.
DELETE: delete a userFor the PATCH method also, we have to provide an id of the user being updated. We will use the endpoint 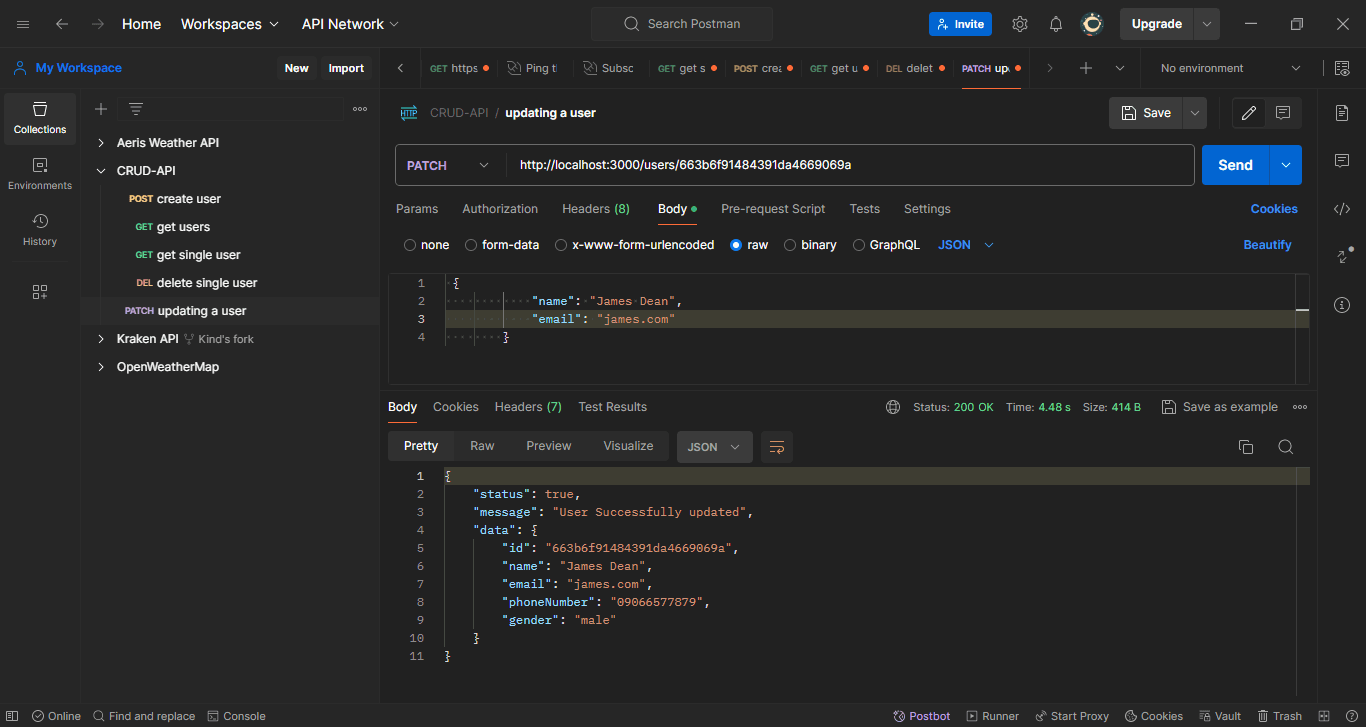
http://localhost:3000/users/id.
PATCH: update a userNotice we passed an invalid value james.com in the e-mail field and it’s seen as valid. This won’t be the case after we implement the validation middleware.
Now, let’s validate the payload of incoming requests (POST, PATCH) to ensure they meet the required data format as specified in our model — i.e., an
e-mail must be a valid e-mail address (not just any string).Create a schemas subdirectory in the src directory, and then create a
user.schema.tsfile.Enter the following code in
user.schema.ts:1 import { z } from 'zod'; 2 3 export const createUserSchema = z 4 .object({ 5 name: z.string().min(1), 6 email: z.string().email(), 7 phoneNumber: z.string().regex(/^\d+$/), 8 gender: z.enum(['male', 'female', 'others']), 9 }) 10 .strict(); //strict prevents the schema from validating payloads with properties not in the schema 11 12 export const updateUserSchema = createUserSchema.partial(); //creates a partial schema from createUserSchema where all properties are optional
In the preceding code, the following schemas were created:
- createUserSchema: This validates the payload coming into the createUser controller via the POST request.
- updateUserSchema: This validates the payload coming into the updateUser controller.
Now, let’s create a validation middleware that uses the schema to validate an incoming payload.
1 import { NextFunction, Request, Response } from 'express'; 2 import { ZodSchema } from 'zod'; 3 4 // Validation middleware 5 export const validateSchema = 6 (schema: ZodSchema) => (req: Request, res: Response, next: NextFunction) => { 7 // parse request body 8 const { success, error } = schema.safeParse(req.body); 9 10 // handle non-compliant request body 11 if (!success) { 12 return res.status(401).json({ 13 status: false, 14 message: error.errors 15 .map((t) => `${t.path[0] ?? ''}: ${t.message}`) 16 .join(', '), 17 }); 18 } 19 20 next(); 21 };
In the preceding code, the Zod schema is used to parse the request body. If the parsing is successful, the next function is called. Otherwise, a JSON response with a 401 status code and an error message are returned.
Now, let’s modify the
user.routes.ts file by adding the validation middleware to the createUser and updateUser routes.1 import { Router } from 'express'; 2 import { 3 createUser, 4 deleteUser, 5 getUser, 6 getUsers, 7 updateUser, 8 } from '../controllers/user.controller'; 9 import { validateSchema } from '../middlewares/validation.middleware'; 10 import { createUserSchema, updateUserSchema } from '../schemas/user.schema'; 11 12 // Users layout Route 13 const userRoute = Router(); 14 15 userRoute.post('', validateSchema(createUserSchema), createUser); 16 userRoute.get('', getUsers); 17 userRoute.get('/:userid', getUser); 18 userRoute.delete('/:userid', deleteUser); 19 userRoute.patch('/:userid', validateSchema(updateUserSchema), updateUser); 20 21 export default userRoute;
In comparison to our previous implementation (without validation), sending an invalid payload will return an error now.
Let’s test the PATCH method again:
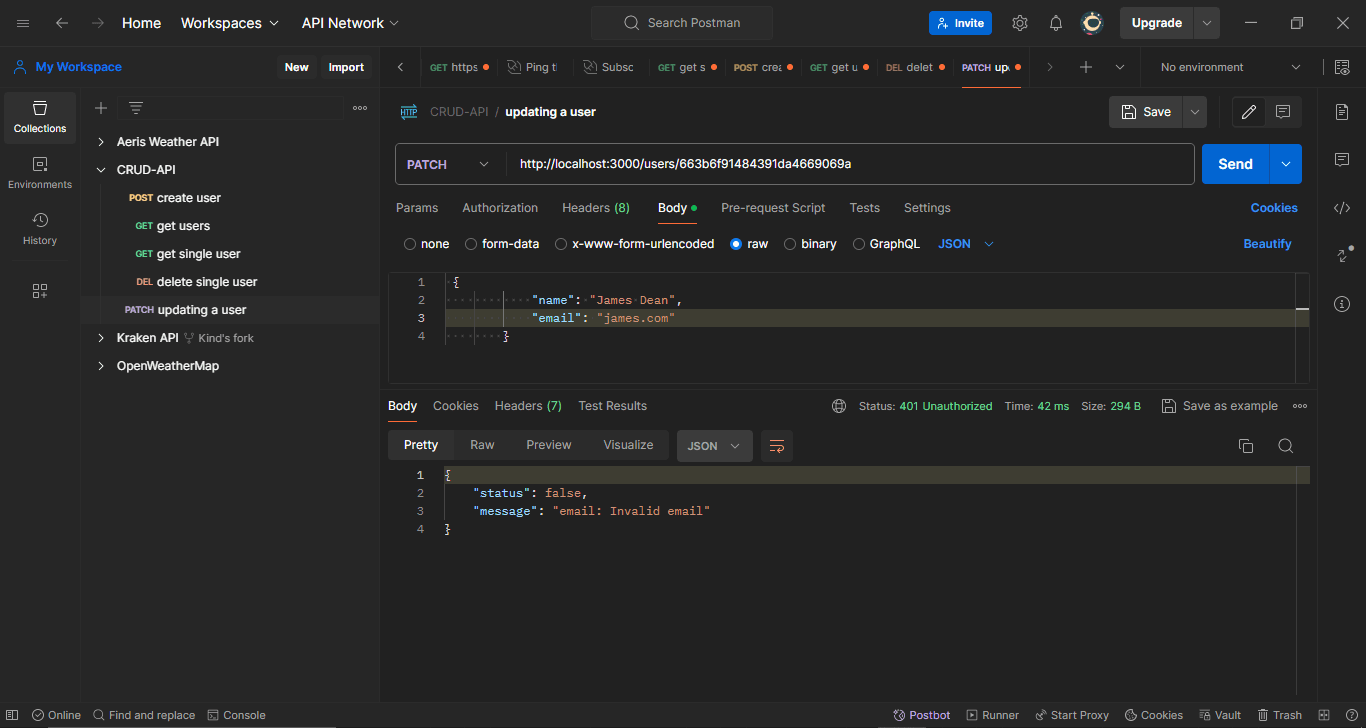
PATCH: Invalid e-mail fieldThis time, we get an error indicating the value of the e-mail field is invalid.
Now, if we use a valid e-mail address, the errors are gone:
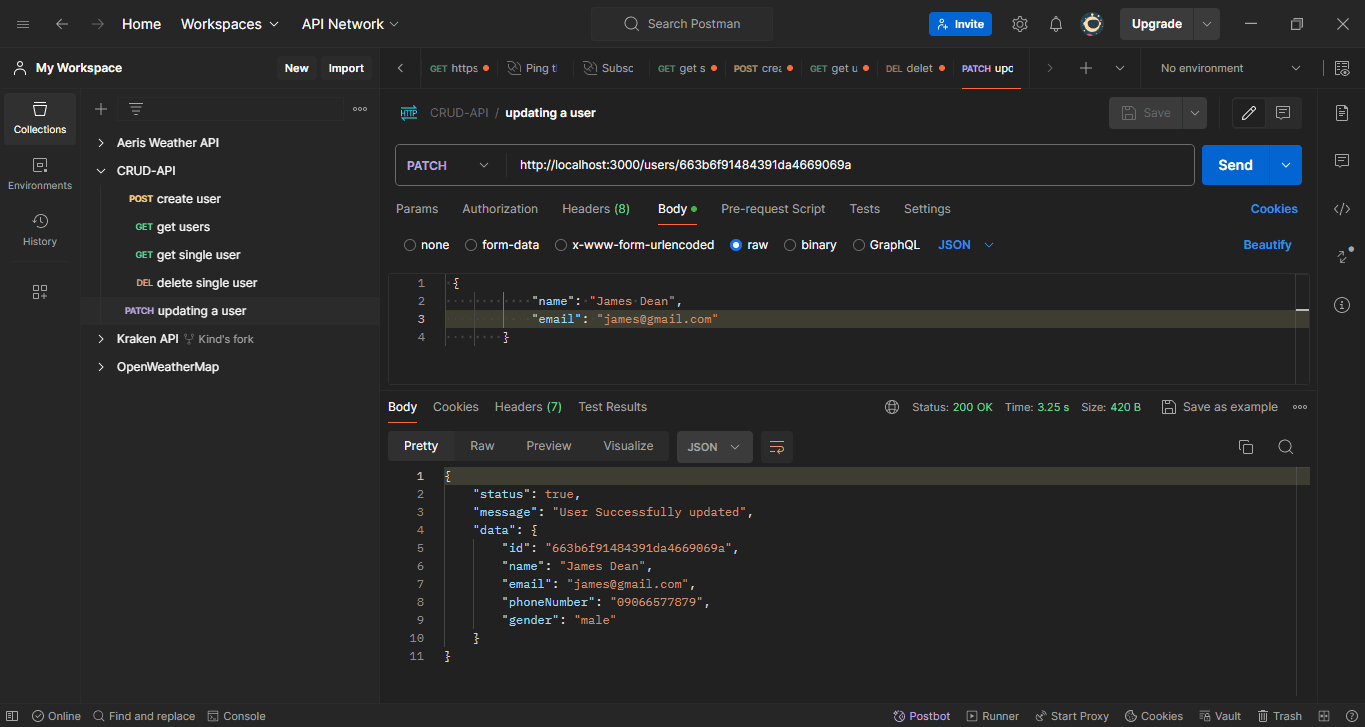 PATCH: Valid e-mail field
In this tutorial, we created a simple CRUD API with Express, MongoDB, and Zod. You learned how to create a server with Express, set up a Prisma schema, validate payloads with Zod, and test API with Postman. Feel free to clone the project from GitHub, sign up for MongoDB Atlas, and build on this foundation. If you want to continue the conversation, join us in the MongoDB Developer Community.