Build Applications and APIs Faster with MongoDB Atlas and AWS App Runner
MongoDB is excited to be a launch partner for AWS App Runner. Most technology organizations today are in the process of adopting DevOps practices and speeding up the development of new containerized apps. However, deploying these apps to production environments has often required additional infrastructure management, thus reducing the agility that containers promise.
MongoDB Atlas provides database infrastructure on demand, simplifying the data layer of DevOps deployments. Atlas makes it simple to create, scale, and tear down databases as needed, smoothing your deployment pipeline.
With AWS App Runner, it’s now even easier to deploy the application component. Given your source code or container image, AWS App Runner builds and deploys the application or API and handles load balancing, scaling, monitoring, and more. There’s no need to manage servers or containers yourself: AWS App Runner handles all of the details.
AWS App Runner-based applications connect seamlessly with MongoDB Atlas, addressing both the application layer and the data layer deployment. Developers can now leverage the scalability and performance of our global, cloud-native database service for their App Runner applications.
MongoDB Atlas & FastAPI on App Runner
Let’s dive into deploying a real API application with AWS App Runner and Atlas to see just how straightforward it is! We’ll demonstrate an example of a microservice API managing MongoDB documents. For this blog, we’re building off the Getting Started with MongoDB and FastAPI post over on the MongoDB Developer Hub.
This app sets up a FastAPI endpoint connected to MongoDB Atlas which provides a basic API to create, read, update, and delete a collection of student documents. The app is self-contained in a GitHub repository: https://github.com/mongodb-devloper/mongodb-atlas-fastapi.
To get started, you simply need your MongoDB Atlas and AWS accounts.
Step 0) Get a MongoDB Cloud Account
If you don’t have an Atlas account yet, you can follow the "Get Started with Atlas" guide to create your account.
Step 1) Create a MongoDB Atlas Cluster
There are many ways to create clusters with Atlas! Choose which option from the following list best suits your needs and experience.
-
MongoDB Atlas UI: the steps in the "Get Started with Atlas" guide will show you how to create your first cluster directly in the Atlas UI. This is the best option for new users. Keep a note of your username, password, and connection string as you will need those later.
-
MongoDB Atlas AWS Quick Start: AWS CloudFormation users can opt to use the new MongoDB Atlas AWS Quick Start to launch a complete Atlas deployment. Once provisioned, you can get the connection string from the Stack Output’s tab in the Cloud Formation web console or AWS CLI.
-
mongocli: Developers and command line aficionados may prefer a more direct method. The latest release of the MongoDB Cloud CLI
mongoclinow boasts a quickstart command which you can use to create cluster’s and so much more. Check it out: https://docs.mongodb.com/mongocli/stable/quick-start/atlas/#configure-an-service-cluster
Whichever method you choose to set up your Atlas Cluster, you can always find the connection string in the Atlas console. Note this for use in the next step, in which you’ll connect your app to MongoDB Atlas. If you have any issues, check out the detailed steps to connect your application to MongoDB Atlas.
Step 2) Launch your app
Open up your AWS Web Console and navigate to AWS App Runner. Click the “Create an App Runner service” button.
AppRunner lets you deploy apps from either pre-built Docker images or Github repositories. Our sample app works both ways. If you want something simple, choose the Docker option. For a more advanced deployment with CI/CD autowired, then opt for the Source code repository integration.
Step 2.1) Launch your app from a Docker image
If you don’t want to mess around with source code, then select the “Amazon ECR Public” and use the following image tag:
https://gallery.ecr.aws/u1r4t8v5/mongodb-atlas-fastapi:latest
Step 2.2) Launch your app from a Source code repository
(Optional - skip to Step 3 if you are deploying your app with the Docker image option)
To use the “Source core repository” option, first create a fork of
https://github.com/mongodb-devloper/mongodb-atlas-fastapi into one of your GitHub organizations. Then, return to AppRunner and follow the instructions to create a new GitHub connection. Finally, select the “mongodb-atlas-fastapi” code repo you just created.
You will need to configure a couple of settings with the GitHub option, but they are all standard.
Runtime: Python 3
Build command: pip install -r requirements.txt
Start command: python app/main.py
Port: 8080
Step 3) Configure and launch your application
For both the Docker and Source Code options select “Next” and then:
-
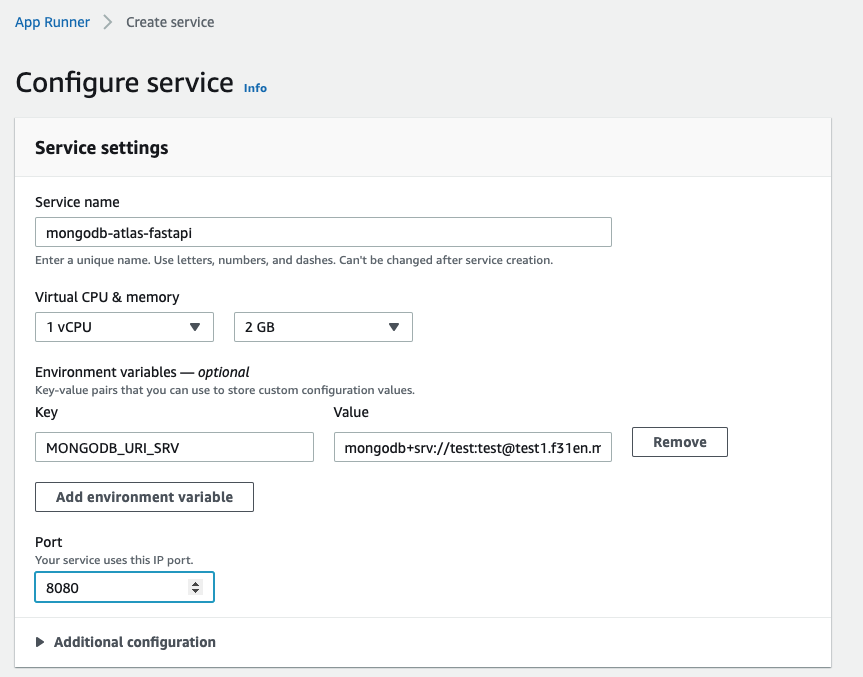
Name your app service:
mongodb-atlas-fastapi -
Click “Add environment variable”, add one variable with your MongoDB Atlas Connection string with Key set to
MONGODB_URI_SRVand paste your connection string for the value. (For example, mongodb+srv://< user>:< password>.test1.f31en.mongodb.net/myFirstDatabase?retryWrites=true&w=majority) -
Set the “Port” to
8080
NOTE - This setting will not show up for Source Code integrations.

You can click Next, review the next page for correctness and then click “Create & deploy”.
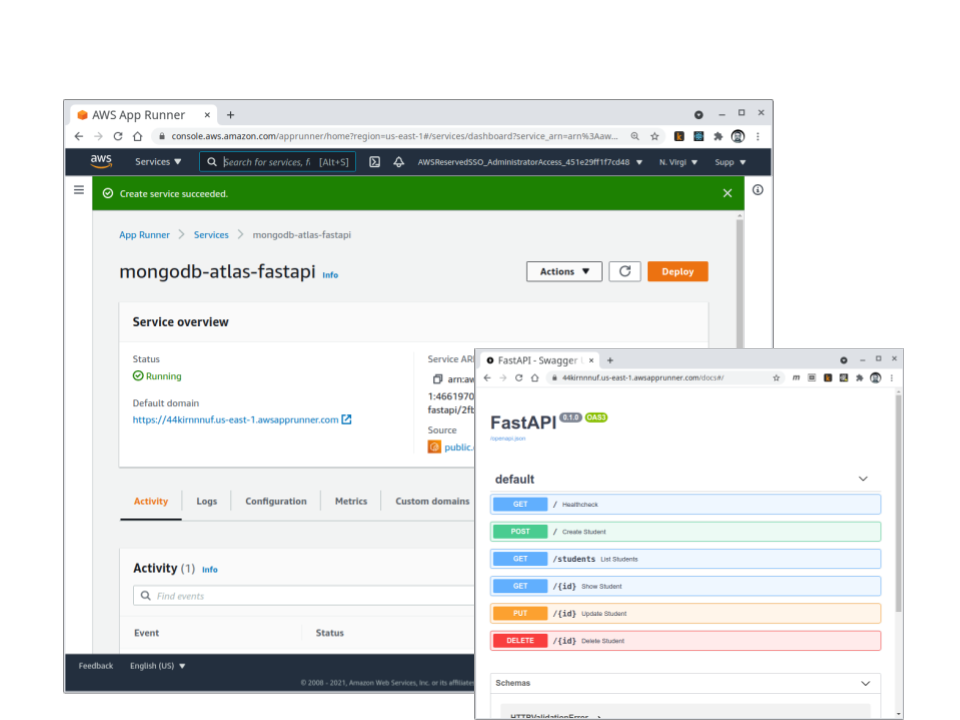
After a few minutes you will have a public URL endpoint to your new Student API with a full UI to manage your documents. Find the ‘Default domain’ value on the AppRunner UI, and click this - you will see your new MongoDB Atlas powered API app!

If you opted to set up the Github integration, then any code changes you push to the project will automatically trigger a new deployment and rollout of your application. Since you’re using MongoDB Atlas, high availability is built in and configuration changes (scaling, upgrading, multi-region expansion, etc.) require the click of a button or simple API call.
Conclusion
With AWS App Runner and MongoDB Atlas, developing, deploying, and evolving an app or API is incredibly easy. In this example, we deployed a containerized API endpoint on top of an Atlas database in a matter of minutes. What will you build?